
Mastering Cannabis Grow Lighting
Mastering Cannabis Grow Lighting: A Comprehensive Scientific Guide
Introduction
Light is the engine of plant growth, and in cannabis cultivation it is arguably the single most important environmental factor. Of all the inputs growers control, lighting has the greatest influence on yield potential and bud quality. Proper lighting reduces stretch, boosts root development, thickens stems, increases flower size, and generally improves plant vigor. Weedth.com’s focus on top-shelf bud quality and rich aroma aligns with optimizing the lighting regimen for cannabis, since lighting not only drives photosynthesis (and thus yields) but can also influence cannabinoid and terpene production. In this guide, we delve into the science of cannabis lighting – from understanding key metrics like PPFD and DLI to balancing light intensity with nutrients and CO₂, from spectrum effects (blue, red, far-red, green, UV) to the nuances of photoperiod and darkness. Both beginners and veteran growers will find evidence-based insights to maximize growth and bud quality using both natural sunlight and modern artificial lights. Let’s illuminate the path to healthier, heavier, and more aromatic harvests!
Why Light is Fundamental in Cannabis Cultivation
Plants literally eat light. Through photosynthesis, cannabis converts light energy into chemical energy to build tissues, more light means more energy for growth. In fact, supplying cannabis plants with adequate light is often cited as the #1 factor for a successful crop. Insufficient light leads to slow growth, lanky stems, and small yields, while optimal light encourages dense, vigorous growth. Key benefits of dialing in proper lighting include:
-
Reduced Stretch: Intense light (especially with some blue spectrum) keeps internodes short, producing compact, sturdy plants. In low light, cannabis stretches toward the source, resulting in thin, weak stems and airy buds.
-
Faster Growth and Bigger Yields: Light provides the energy for photosynthesis, so higher light exposure (up to an optimal point) directly increases growth rates and bud weight. As a rule, more photons = more cannabis biomass, assuming other factors are in balance.
-
Improved Root and Shoot Development: Proper light intensity stimulates robust root systems and lush foliage. Seedlings given adequate light form strong roots and leaves early on, setting the stage for healthy vegetative growth.
-
Enhanced Bud Quality: Light can influence secondary metabolism – for example, high light levels (and certain wavelengths like UV-A/B) can induce the plant to produce protective compounds such as cannabinoids and flavonoids. Well-lit cannabis tends to develop bigger, more resinous flowers with rich terpene profiles, whereas plants grown in poor light often have lower potency and aroma.
In short, light is the fundamental fuel for cannabis growth and bud formation. Even the best nutrients, genetics, and care cannot compensate for a light deficiency. Growers must therefore treat lighting as a top priority and ensure their plants receive the quantity (intensity and duration) and quality (spectrum) of light they need at each stage of growth.
Understanding Light Intensity: PPFD and DLI
When discussing light in plant terms, two key metrics are used: PPFD and DLI. Grasping these concepts is essential for optimizing a cannabis lighting regimen.
-
PPFD (Photosynthetic Photon Flux Density): This measures the intensity of light (specifically photons in the 400–700 nm PAR range) hitting a surface per second, reported in micromoles per square meter per second (µmol/m²/s). In simpler terms, PPFD tells us how bright the light is at the plant canopy. A higher PPFD means more photons bombarding the leaves each second. Cannabis, being a high-light crop, generally prefers PPFD levels in the mid-hundreds up to around 1000 µmol/m²/s during vigorous growth phases. For instance, recommended PPFD in cannabis gardens is often 500–1000 µmol/m²/s, as within this range the plant photosynthesizes rapidly; below about 500 growth slows, while beyond ~1000 the gains in growth rate taper off unless other conditions (like CO₂) are enhanced. In essence, PPFD is the instantaneous light intensity the plant receives. More PPFD = more potential photosynthesis (up to a point of saturation).
-
DLI (Daily Light Integral): While PPFD is a snapshot of light intensity, DLI measures the total quantity of light delivered over an entire day. It is expressed in moles of photons per square meter per day (mol/m²/day). Think of DLI as the cumulative “dose” of photons the plant receives in 24 hours. Even a moderate PPFD can translate to a high DLI if the lights are on for longer periods. For example, a PPFD of 500 µmol/m²/s applied for 12 hours yields a DLI of about 21.6 mol/m² (500 µmol/m²/s × 43,200 s / 1,000,000) whereas the same 500 µmol over 18 hours gives ~32.4 mol/m². Cannabis originated as a full-sun plant in regions like Nepal, Afghanistan, etc., which means it evolved to thrive under high daily light exposure. Outdoors in peak summer sun, DLI can easily reach 40–60+ mol/m²/day in sunny climates. Accordingly, indoor cannabis generally performs best at relatively high DLI values compared to many other plants. Growers can manipulate DLI by both adjusting light intensity and the photoperiod (hours of light). For instance, an 18-hour vegetative schedule with moderate PPFD can achieve a similar DLI as a 12-hour flowering schedule with higher PPFD. Understanding DLI helps ensure your plants get enough total light each day for optimal growth. It also prevents over- or under-lighting: if you know the target DLI for a growth stage, you can combine hours and intensity to hit that number without guesswork.
In practice, PPFD and DLI work hand in hand. You might think of PPFD as the rate of light delivery, and DLI as the daily budget of light. Both are important: cannabis has an appetite for a certain daily total of photons, and delivering those photons at an appropriate rate (not too weak or too intense at once) will maximize photosynthesis. For example, you could reach a given DLI by having lower PPFD for more hours or higher PPFD for fewer hours – but cannabis will respond differently. Generally, there’s a balance: extremely long light periods at low intensity can cause diminishing returns (or waste electricity), whereas extremely high intensity for short periods can stress plants even if the total photons are the same. Thus, growers often target an optimal DLI for each phase of growth and adjust their lamp output or schedule accordingly. A common guideline is aiming for roughly 10–15 mol/m²/day for seedlings, 25–30+ mol/m²/day in veg, and 30–45+ mol/m²/day in flowering (higher end with CO₂). These aren’t hard rules but ballpark figures that underscore cannabis’ high light demand relative to many crops. By measuring PPFD at the canopy and multiplying by the photoperiod, you can calculate DLI and ensure your plants are getting the light they require each day.
Cannabis Thrives Under Intense Light (Compared to Other Crops)
One thing that sets cannabis apart from many common crops is its exceptional ability to utilize high light levels. Some plants (especially leafy greens and shade-tolerant species) reach a point of light saturation at relatively low intensities – meaning beyond a certain PPFD, more light doesn’t significantly increase photosynthesis or growth. Cannabis, however, has a much higher light saturation point, allowing it to keep benefiting from additional light far beyond the range most crops do.
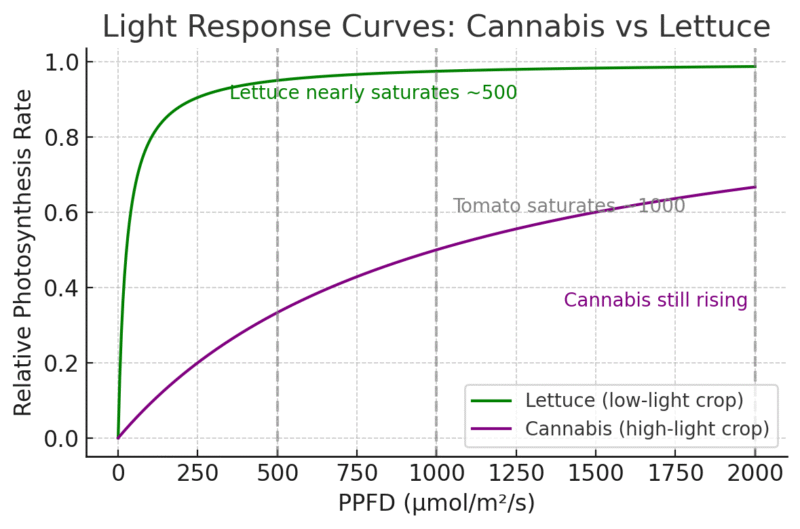
To put numbers to it, a typical lettuce or herb might achieve maximum growth with a PPFD around 200–400 and a DLI of ~15–20 mol/m²/day. Adding more light beyond that yields diminishing returns or can even cause chlorosis. Cannabis, on the other hand, can flourish under much stronger light. Modern studies have demonstrated that cannabis’ photosynthetic capacity and yield continue to rise at PPFD levels of 1000, 1500, even 1800+ µmol/m²/s (when conditions like CO₂ are also optimized). One controlled experiment showed dry bud yield increasing straight-line with no plateau up to 1,800 µmol/m²/s, whereas individual leaves had saturated at a lower level – indicating the whole plant was able to utilize the extra light by packing on more buds and foliage. This is an extraordinary light tolerance; for comparison, many “full sun” greenhouse crops like tomatoes saturate around ~800–1000 µmol/m²/s, and leafy greens like lettuce around ~500 µmol/m²/s. Cannabis can effectively leverage intensities approaching full midday sunlight (which is ~2000 µmol/m²/s) when provided in an indoor setting.
Why is this significant? It means giving cannabis ample light can unlock a higher ceiling of growth. A cannabis plant under 400 µmol/m²/s might look healthy, but it is likely performing far below its potential compared to one under 800 or 1000 µmol/m²/s, which will yield heavier, denser buds. Outdoor growers see this in practice – under bright summer sun, cannabis can grow into huge, high-yielding bushes. Indoors, to mimic that, growers use powerful lights (LED, HPS, etc.) to drive photosynthesis hard. Many experienced indoor cultivators now aim for around 800–1000 µmol/m²/s at the canopy during peak flowering (which corresponds to a DLI in the 30–40+ range over 12 hours) for CO₂-unenriched environments, and even higher (1200–1500 µmol/m²/s) if supplementing CO₂. These levels would be excessive for most other crops but can significantly boost cannabis yields as long as the plants are not otherwise stressed.
That said, there is a practical upper limit – it’s not that cannabis has infinite appetite for light, but rather that its point of diminishing returns is at a much higher intensity than most plants. Typically, without added CO₂, cannabis growth efficiency starts to flatten somewhere around 1000–1100 µmol/m²/s PPFD, and pushing light beyond this requires enriched CO₂ to see continued gains. With CO₂ enrichment (e.g. 1200–1500 ppm), studies have seen near-linear growth increases up to ~1500–2000 µmol/m²/s. Beyond full sunlight intensity (~2000), even cannabis likely experiences saturation or light stress (and lighting efficiency falls off in an economic sense). But very few indoor setups reach that level anyway. The takeaway for growers is that cannabis loves light – more so than almost anything you might be familiar with in a vegetable garden. If you want big yields, you need to deliver a high DLI. A bright, high-PAR environment (while managing heat) is key to heavy, top-quality buds, which is why professional grows use intense lighting systems and why outdoor plants in sunny climates tend to outperform those in cloudy or shaded ones.
(A note of caution: high light tolerance doesn’t mean you can blast young or unacclimated plants with extreme light from day one. Cannabis seedlings and clones still need to ease into intense light – they start with a lower light requirement and ramp up as they mature, as discussed in a later section. Always observe your plants for signs of light stress like drooping or bleached leaves when increasing light levels.)
Balancing Light Intensity with Nutrients, Water, and CO₂
Light is a driving force in growth, but it doesn’t work in isolation. Think of a powerful engine in a car – if you upgrade the engine, you must also upgrade the tires, suspension, and fuel supply to handle the extra power. Similarly, pushing cannabis to high light levels requires all other growth factors to be in balance; otherwise, the extra light can’t be fully utilized and may even cause stress. In cannabis cultivation there’s a principle: the growth rate is limited by the most deficient factor (Liebig’s law of the minimum). Once light is no longer limiting, something else will be – often CO₂ or nutrients.
-
CO₂: Carbon dioxide is the raw material plants combine with light energy to create sugars. In normal air (~400 ppm CO₂), photosynthesis becomes CO₂-limited at high light because the plant uses up internal CO₂ faster than it can diffuse in. Cannabis at ~1000 µmol/m²/s PPFD (or higher) will benefit greatly from additional CO₂; without it, photosynthesis can’t keep increasing much past that intensity. Growers find that to effectively use PPFD levels above ~1000, CO₂ enrichment to ~800–1500 ppm is necessary. With CO₂ supplementation, cannabis can take advantage of extremely high light (as noted, up to ~2000 µmol). Without CO₂ enrichment, blasting plants with 1500+ PPFD may waste light or cause leaves to “flatten out” and show signs of stress because the plant’s carbon intake isn’t sufficient to match the light input. Always ensure adequate fresh air exchange or CO₂ addition in high-light grow rooms.
-
Water and Nutrients: Light-driven photosynthesis creates demand for more water and minerals. Under intense light, cannabis drinks more and eats more. Transpiration (water uptake and evaporation through leaves) increases with light intensity, meaning you’ll likely need to water more frequently as you raise PPFD. The good news is if your plants are transpiring more, they are also generally growing more – studies show water use efficiency (grams biomass per liter water) stays relatively constant, so more water in can mean more growth out, as long as moisture is not a limiting factor. Nutrient uptake similarly scales up: the plant will absorb more N, P, K, and micronutrients to support the accelerated growth fueled by light. This does not mean simply force-feed extra fertilizer – rather, ensure your nutrient solution strength is sufficient and avoid deficiencies. For example, fast-growing, high-light cannabis may need more calcium, magnesium, and overall EC in feed than a slow-growing, low-light plant. However, be cautious: oversupplying nutrients “just in case” can do more harm than good. It’s best to maintain a balanced nutrient profile and let the plant uptake increase naturally with higher light. One recommended practice when moving into high-light “fast lane” growth is to monitor plant nutrient status (leaf coloration, EC runoff) closely; any imbalance (e.g. slight nutrient excess) that might be tolerated under lower light could quickly manifest as burn or lockout under high light conditions. Essentially, high light will expose any weakness in your feeding or watering regimen quickly, so everything must be dialed in. If you raise the light intensity, be prepared to adjust watering frequency and ensure consistent nutrient availability.
-
Temperature: More light equals more absorbed energy, some of which turns into heat within the leaf. High photon flux can raise leaf surface temperatures. Growers often have to run slightly cooler air temps when increasing light levels, to keep leaf temperatures in the optimal range (around 25–30°C for most cannabis). If you blast plants with light without managing temperature, they can overheat or undergo extra stress. Conversely, cannabis under lower light might prefer the higher end of the temperature range to keep metabolism humming. So, when turning up lights, watch your climate – you may need stronger cooling or to increase airflow across the canopy to remove heat. A well-known guideline is the concept of VPD (vapor-pressure deficit) which ties temperature and humidity to plant transpiration; under high light, maintaining proper VPD by adjusting temperature/humidity is critical so the plant can keep stomata open and photosynthesize efficiently.
In summary, high-intensity lighting should be accompanied by “high-intensity” horticulture. If you give your plants more light, be ready to also give them more CO₂ (or fresh air), more water, and enough nutrients, all while keeping the climate optimal. When everything is optimized, cannabis can truly take off under intense illumination – producing lush canopies and heavy yields. But if one factor lags (say, CO₂ stays at ambient), the plant cannot use all the light and the excess energy can lead to photooxidative stress (bleaching, leaf burn, etc.). Many lighting “myths” or failures (e.g., “too much light killed my plants”) are actually cases of unbalanced conditions – it wasn’t the photons alone, but the lack of coordination with feeding or CO₂. The goal is to push the growth engine hard and supply it with enough fuel and cooling. With this balance, cannabis grown under powerful lights can reach its genetic potential in both quantity and quality.
Measuring Light: Why Proper Tools Beat Guessing Distance
A common mistake among new growers is relying on the distance of the light from the canopy as a proxy for intensity. You might see advice like “hang your LED 18 inches above the plants,” and while distance is indeed a factor, it’s not a reliable way to know how much light your plants are actually receiving. The only accurate way to gauge light intensity is to measure it – ideally with a PAR/PPFD meter (quantum sensor) or at least a well-calibrated lux meter with appropriate conversion for your light type. Here’s why distance alone isn’t enough:
-
Different Lights, Different Outputs: A 400W HPS lamp at 18 inches is not the same as a 100W LED at 18 inches or a 1000W LED at 18 inches. Each fixture has its own output and beam spread. For example, older high-intensity discharge lamps (HPS/MH) and small box-style LEDs produce very concentrated light and heat; they often needed to be hung 30–90 cm (1–3 feet) above the canopy to avoid burning the plants. In contrast, modern LED panels or bars that spread light over a larger area can be placed much closer (sometimes only 15 cm / 6 inches above) without causing hotspots. Thus, a fixed distance rule cannot apply universally – 45 cm away might be perfect for one light and insufficient or too much for another.
-
Inverse-Square Law and Footprint: Light intensity falls off with distance, but how quickly depends on the geometry of the light source and reflectors. Point sources follow an inverse-square law (intensity drops dramatically as distance increases), whereas distributed arrays (like LED bars) give a more uniform field. Manufacturers often provide PPFD maps at specific hanging heights – these are more useful than generic distance guidelines. Two lights at the same distance could have vastly different PPFD at the canopy. Therefore, measuring the actual PPFD at plant level is critical. Don’t assume because you hung the light at the manufacturer’s recommended height that you’re hitting the target – verify it with a meter if possible.
-
Human Eyes Can’t Judge Plant-usable Light: Some growers try to judge brightness by eye or in lux, but our eyes are poor judges of PAR intensity. Plants use a broader spectrum (blue through red) and are most sensitive to red photons which humans perceive as less bright. A room may look bright, but without measurement you could be at half the PPFD you think, or conversely you might be giving too much. Use the right tool: A quantum PAR meter (often a handheld sensor) will directly read out PPFD in µmol/m²/s. If a professional meter is not accessible, you can use smartphone apps or lux meters with known conversion factors (for example, in LED white light, 1 lux ≈ 0.015–0.02 µmol/m²/s, though it varies by spectrum). Some modern phone apps can estimate PPFD/DLI using the phone camera sensor. In any case, relying on instrumentation is far superior to guesswork.
-
Consistency and Mapping: By measuring, you can also discover how uniform your light is across the canopy. You might find the center of your grow tent is getting 900 µmol but the corners only 400. This might prompt you to adjust light height or add reflective materials to even out distribution. Creating a PAR map (measuring PPFD on a grid across the canopy) is an illuminating exercise – it shows you exactly where your plants are bathed in light and where shadows or drop-offs occur. Distance alone wouldn’t reveal these micro-variations, but a meter will. Many growers are surprised to find how much intensity can vary across just a 4×4 area.
In practical terms, investing in a light meter or using a reliable app can pay huge dividends. It takes the guesswork out of lighting. Instead of asking “how far should my light be,” you can ask “what PPFD should I target?” and then simply move the light or adjust dimming until your meter reads that value at canopy level. For example, if you want ~700 µmol for bloom, you measure at the top of your plants and adjust until ~700 is achieved on average (accounting for multiple points). This approach also helps with multi-light setups and different growth stages – you can quickly dial each zone to the appropriate intensity. Moreover, if problems arise (like light burn or pale leaves), you can confirm if light intensity was a contributing factor by checking the PPFD. This kind of data-driven approach is far more reliable than rules of thumb based on distance.
Remember: as plants grow taller, their distance to the light decreases, so PPFD will increase. You’ll need to raise fixtures or dial them down to maintain the correct intensity. Regularly measuring at the canopy (especially after moving lights or when plants have noticeably grown) will ensure you’re keeping them in the optimal range. Using proper measurement tools takes the ambiguity out of lighting adjustments and lets you apply the science of light in a precise way.
Finally, avoid the myth that “you can judge the right height by putting your hand under the lamp to feel heat.” While ensuring the canopy isn’t too hot is important, thermal comfort of your hand doesn’t equate to correct PAR levels. LEDs, for instance, run cool but can still deliver damagingly high light intensity. Always trust the meter over subjective measures. In summary, light is to plants what dosage is to medicine – you must measure it to get it right. By doing so, you’ll provide your cannabis crop exactly what it needs for maximum growth without inadvertent over- or under-lighting.
Light Spectrum and Cannabis – Blue, Red, Far-Red, Green, and UV
Not all light is equal for plants. The spectrum (color/wavelength composition) of light impacts both photosynthesis and plant development (photomorphogenesis). Cannabis, like other plants, primarily uses the 400–700 nm range (the PAR region) for photosynthesis, but it responds in nuanced ways to different colors within that range – and even to wavelengths just outside it (UV and far-red). Let’s break down the major portions of the spectrum and how each influences cannabis growth and cannabinoid synthesis:
Blue Light (400–500 nm)
Blue photons carry high energy and are strongly absorbed by chlorophyll and carotenoids, but plants use blue light for more than just photosynthesis. Blue light has significant effects on plant shape and secondary metabolism. It is detected by photoreceptors like cryptochromes and phototropins, which signal the plant to adjust its growth form. In cannabis, blue light tends to produce stockier, shorter plants with thicker leaves – it reduces stem elongation (preventing stretch) and encourages stomatal opening (which can enhance CO₂ uptake). During vegetative growth, having a certain proportion of blue light (e.g. 15–25% of the spectrum) can keep internodes tight and foliage lush, which is often desirable. However, pure blue light is less efficient for photosynthesis compared to red light. Experiments (e.g. McCree’s classic studies) found that the quantum yield of photosynthesis under blue is about 65–75% of that under optimal red wavelengths. In other words, plants use blue light a bit less efficiently to fix carbon. For growers, this means some blue is very beneficial for form and possibly quality, but an all-blue diet would not maximize growth rate. Most broad-spectrum grow lights (and sunlight) naturally contain a mix of blue and other colors, so this is usually only a consideration when using monochromatic LEDs.
Blue light has also been linked to higher levels of certain secondary compounds. It tends to increase flavonoid and anthocyanin production (protective pigments) which can translate to richer coloration in some strains. There’s evidence that blue combined with UV-A can even spur certain cannabinoid production – one study noted a synergy between UV-A and blue light that induced higher cannabigerol (CBG) accumulation in cannabis flowers. While the primary role of blue is controlling morphology (keeping plants compact) and guiding phototropism (plants bending toward light), these side effects on chemistry are intriguing. Many growers believe a moderate amount of blue (e.g. using “cool white” or full-spectrum LEDs vs pure HPS which is low in blue) can improve bud quality, resin production, and terpene profile. Scientifically, blue light does trigger stress-defense pathways to a degree, which can lead to production of compounds like UV-screening flavonoids – some of which are also antioxidants beneficial to humans.
How to apply blue light: During vegetative stage, ensure your lighting isn’t devoid of blue. Most white LEDs or MH (metal halide) lamps have plenty. If using HPS (which is very red-heavy), consider supplementing with a MH or CMH lamp or modern full-spectrum LEDs to provide a blue component. In flower, a bit of blue can help maintain bud structure (excessive red/far-red with no blue might cause extra stretch). Some growers even increase blue ratio late in flowering, thinking it might boost resin (anecdotal). However, avoid extremely high blue fractions (like >30–40% of total light) for prolonged periods, as it can slow growth – remember it’s less efficient photosynthetically. The key is balance: a mix weighted toward red with enough blue to keep the plant “in shape.”
Red Light (600–700 nm)
If blue is for form, red is for yield. Red light is the most efficient at driving photosynthesis – it corresponds to peaks in chlorophyll absorption and sets off the highest quantum yield. In McCree’s action spectrum, red wavelengths (around 660 nm) were about 100% relative efficiency, essentially the gold standard for photon efficiency in photosynthesis. Red light energizes the photosystems to produce sugars, fueling growth of stems, leaves, and buds. For this reason, nearly all grow lights include a strong red component. High-pressure sodium (HPS) lights, which have grown cannabis successfully for decades, are very rich in red-orange light. LED manufacturers often emphasize deep red diodes for bloom boosters, and there is solid reasoning behind it: under heavy red light, cannabis tends to yield more mass (all else being equal) because it can photosynthesize robustly.
However, pure red light has downsides if used alone. Under only red light, plants can become stretched and may have less structural integrity. This is because the ratio of red to blue/far-red influences the shade-avoidance response. A very high red with low blue situation mimics “canopy light” (filtered sunlight under a forest), which can signal a plant to stretch to compete for light. In cannabis, using exclusively red-heavy “blurple” LEDs or HPS without any blue spectrum can lead to taller plants with longer internodes, which is not always ideal (except perhaps early in veg if you intentionally want fast vertical growth). This is why most modern LED fixtures are full-spectrum (including some blue and green) rather than pure red/blue peaks – plants simply grow better (more normally) under a broad spectrum.
Red light also plays a key role in flowering signals via the phytochrome system. Cannabis, being photoperiodic, uses the red/far-red light detection to know daylength. Red light keeps phytochrome in its active form during the day. When lights go off, phytochrome slowly reverts to its inactive form (unless far-red hastens it – more on that in a moment). While the timing of flowering is primarily about uninterrupted darkness, the amount of red in your light doesn’t change the need for 12-hour nights, but it can affect the transition. Some advanced growers experiment with end-of-day far-red treatments to manipulate this (again, coming up next). Generally, a strong red spectrum during both veg and bloom will ensure your cannabis has the energy to build yield.
Bottom line for red: Cannabis absolutely needs red light for strong photosynthesis – make sure your lighting has plenty in the 600–660 nm range, especially in flowering. Virtually every standard grow light does, so it’s usually not a concern unless someone tries an all-blue or experimental setup. If anything, ensure red isn’t too dominant without blue to avoid lanky growth. A mixture like warm-white LEDs or HPS (which also emits some orange/yellow) combined with a bit of blue tends to produce great results. When in doubt, err on the side of more red for weight. As an aside, red light is also quite efficient electrically (LEDs produce more photons per watt in red), making it cost-effective for growers.
Far-Red Light (700–750+ nm)
Far-red lies just beyond the traditional PAR range. Historically, photons above 700 nm were not counted as usable light for photosynthesis, but research in recent years – notably led by Dr. Bruce Bugbee’s team – has redefined PAR to include far-red up to 750 nm because it has measurable synergistic effects on photosynthesis. Far-red (FR) photons on their own have low chlorophyll absorption, but when combined with red light they trigger the Emerson enhancement effect – basically, red and far-red together result in more photosynthesis than red alone. Far-red also penetrates deeper into leaves and lower canopy due to its longer wavelength, potentially increasing light capture in shaded leaves.
In practical cultivation, far-red is a double-edged sword. It affects plant morphology strongly via the phytochrome system. High far-red relative to red simulates shade (because green leaves absorb red but reflect/transmit far-red, so under a canopy the light is enriched in far-red). Plants respond to a high FR:R ratio by stretching – elongating stems and leaf petioles to try to outgrow competitors. Cannabis is very sensitive to this; excess far-red can cause unwanted stemminess and taller plants. On the other hand, controlled doses of far-red can be beneficial: FR causes leaves to expand more (increasing surface area for light capture) and can help “close” a canopy quicker. It also can slightly hasten flowering initiation if used at day’s end (an end-of-day far-red treatment can convert phytochrome to the inactive state faster, effectively lengthening the perceived night).
So how to use far-red to your advantage? The key is timing and balance. One strategy from research is: In vegetative stage or early growth, provide a small amount of far-red along with normal light to promote leaf expansion and canopy formation – this helps plants fill out space faster. But avoid too much far-red during the critical stretch period (the first 2–3 weeks of flowering), as it will exaggerate stretching when you actually want to control plant height. Many LED grow lights for bloom intentionally limit far-red diodes or allow them to be turned off during early flower to prevent excess elongation. Once that stretch phase is over, in later flowering (say last 3–4 weeks), reintroducing far-red can be useful. The plants are mostly done growing taller by then, so far-red can again be used to increase photosynthetic efficiency and drive those last gains in bud mass. Some modern fixtures have “far-red initiation” or “finish” modes that add FR at end of day or throughout late flower.
Empirical results show that supplementing far-red in flower can increase yield because more of the lower canopy gets useable light (FR can excite photosystem I and broaden the effective PAR). In one study, adding far-red (with ample red) led to larger, less shaded leaves and potentially higher overall canopy photosynthesis. Growers should note though: if you blast far-red all through the grow, you’ll likely get tall, less-manageable plants. If used strategically, you get the best of both worlds – broad leaves and high photosynthesis, without excessive stretch.
In summary, far-red went from being ignored to being a hot topic in horticultural lighting. Cannabis “doesn’t count” far-red as part of the 12-hour photoperiod (you can sneak a few minutes of far-red at lights-off to trigger sleep without affecting flowering schedule), and it can be leveraged to maximize growth. Many full-spectrum LED lights now include some ~730 nm diodes. If yours doesn’t, it’s not a deal-breaker – cannabis grew fine under HPS (which has moderate far-red) for years – but it’s an area of potential improvement. Keep far-red moderate and targeted in use. When done right, far-red photons can increase leaf area and yield. But remember: a little goes a long way; you typically need far fewer far-red photons than red/blue. The ideal ratio is still being studied, but something like 10-20% of total photon flux as far-red (with the rest in PAR) can be beneficial.
Green Light (500–600 nm)
Green light has long been misunderstood in plant lighting. Early grow LED panels infamously lacked green (resulting in that eerie purple glow) under the belief that green is not used by plants (because leaves appear green, reflecting that color). In truth, cannabis uses green light quite effectively, albeit differently than red or blue. McCree’s research showed that green photons have about 70% of the photosynthetic efficiency of red ones – certainly not zero. While leaves do reflect some green (which is why we see them as green), a significant portion penetrates into the leaf and canopy. In fact, green light penetrates deeper into leaves and through the canopy than red or blue, which tend to be absorbed in the upper layers. This means green light can reach lower chloroplasts and even leaves beneath the top of the canopy, driving photosynthesis where other wavelengths can’t.
For cannabis growers, the inclusion of green wavelengths in your light spectrum results in more uniform growth top to bottom. Under exclusively red/blue light, the top leaves may photosynthesize well, but lower leaves might be under-lit (as red/blue are absorbed strongly up top). Adding green light helps push some photons further down, supporting those inner and lower bud sites. Studies in other crops have found that mixtures including green can increase whole-plant photosynthesis for this reason.
Besides photosynthesis, green light offers practical benefits: it makes working in the grow space easier on the eyes (full-spectrum white light, which contains green, appears “white” to humans, while red/blue-heavy light is dim and purple to us). This is not just aesthetics – growers can more easily spot issues like nutrient deficiencies, pests, or molds under a broad-spectrum light because leaf colors appear natural. Under pure blurple, everything looks… purple, masking these signals.
Cannabis does not have any special negative response to green; in fact, there is evidence that green can influence certain photoreceptors and circadian rhythms. Some research suggests low levels of green light during the dark period have less effect on interrupting photoperiod (which is why “green lights” are sometimes used in grow rooms for brief access in the dark). However, caution: prolonged or intense green light will affect plants – they are still sensitive to it if the intensity is above a very low threshold. So the idea that green is “invisible” to plants is a myth – they do use it and can even be disrupted by it if used in the dark cycle (more on that in the next section).
In summary, ensure your cannabis gets a full PAR spectrum including green (which is naturally the case if using sunlight, fluorescent, white LEDs, HPS, etc.). If you have older style pure red/blue LEDs, know that your plants will still grow, but potentially with slightly less efficiency and more difficulty in observation. The trend in lighting is toward full-spectrum, sun-like outputs, precisely because research has shown that, for maximizing growth and quality, plants use all parts of PAR – blue, green, and red – just at different efficiencies. Green is about 70% as efficient as red for growth, but that 70% across a deeper canopy can contribute substantially. Therefore, don’t fear the green – embrace it as part of a balanced light diet for your cannabis.
Ultraviolet Light (UV-A and UV-B)
UV light is the range below ~400 nm, invisible to our eyes. It’s divided into UV-A (320–400 nm), UV-B (280–320 nm), and UV-C (<280 nm, which doesn’t naturally reach the earth’s surface and is irrelevant to plant growth except as a sterilizer). In cultivation, when growers talk about UV, they usually mean UV-A (like the output from UV LEDs or blacklight fluorescents) or UV-B (like from special UVB reptile bulbs or the sun at high elevation). UV is not needed for photosynthesis – in fact, photons below 400 nm are mostly not used for driving the light reactions (they are outside PAR). However, UV can have pronounced photomorphogenic and biochemical effects on cannabis.
UV-A (near-UV): Overlaps with violet light. UV-A (e.g. 365–395 nm) is detected by cryptochrome and UVR8 receptors in plants. It can induce protective responses similar to blue light. UV-A on its own doesn’t carry enough energy to severely damage DNA like UV-B can, but it can still cause oxidative stress in high doses. Many full-spectrum LEDs actually emit a little UV-A (some have diodes down to 380 nm), and it’s generally considered mild but possibly beneficial stress. For instance, as mentioned, one study found UV-A in combination with blue increased CBG levels, hinting that UV-A can stimulate certain secondary metabolite pathways.
UV-B: This is the more energetic ultraviolet that can be harmful in excess. UV-B can directly damage DNA, proteins, and membranes – which is why plants (and humans) produce protective compounds in response. In cannabis, UV-B exposure has been associated with increased THC production – the theory being THC (and other cannabinoids) may act as a sunscreen for the plant, absorbing UV to protect tissues. Classic experiments from the 1980s (Lydon et al., 1987) showed that cannabis plants under UV-B had higher THC content than those grown without UV-B. More recent observations and anecdotes support that moderate UV-B can bump up resin production and possibly potency. Additionally, UV-B (and UV-A) can increase flavonoids like apigenin and luteolin (which are UV-protectant pigments). Some terpenes might also increase under UV stress, contributing to aroma, though data is limited.
However – a big caveat – too much UV, especially UV-B, will hurt your plants. High doses cause leaf burn (appearing as necrotic spots or bronzing) and can stunt growth (since the plant diverts energy to protection and repair). So this is a tightrope: a little UV can trigger defensive chemistry, but too much will reduce overall growth. How much is a little? In practice, growers using UV-B fluorescent tubes might run them for only 1–2 hours a day during mid-flower, at a distance, just to give a dose akin to high elevation sunlight. It’s tricky to quantify exactly, but one must mimic nature – in full sun at 10,000 ft altitude, UV-B might be a few µmol/m²/s at most. In the MIGRO study on dark cycle interruption, they noted that as little as 0.01 µmol/m²/s of light (extremely low) can affect cannabis – that was PAR, not UV specifically, but it shows how sensitive plants can be to small light levels. For UV-B, even lower intensities can matter since it’s potent.
Does adding UV truly increase potency significantly? The evidence is mixed. Some commercial growers report no detectable increase, while others swear by it. A plausible outcome is that UV might increase cannabinoid content slightly (a few percentage points) but not dramatically, and only if other conditions are optimal. It may contribute more to terpene or flavonoid content (those “rich aromas” Weedth enthusiasts love), potentially enhancing the sensory quality of the bud. What is clear scientifically is that UV triggers protective pathways: **THC and other cannabinoids **are found in higher concentration when cannabis is grown under UV stress, supporting the idea they play a role in UV protection for the plant. Even limited research has noted, for example, that combined UV-A and blue led to more CBG, or that UV treatments can increase certain minor cannabinoids or flavonoids.
Using UV in the grow: If you choose to supplement UV, do so carefully. UV-A LEDs (365–395 nm) are safer and still may induce some response; you can run those for longer durations as they are gentler (still, there’s no need to run them 18 hours – a few hours during peak “sun” period might suffice). UV-B should be used sparingly – perhaps in the last few weeks of flower to avoid affecting vegetative growth or early flowering (you don’t want to stunt bud development early on). Introduce it for short intervals and monitor the plant. If leaves start getting patchy or bronze, back off. Protective eyewear and skin protection are a must for growers when working around UV-B sources; it’s dangerous to humans too.
If you decide not to bother with UV, that’s fine – you can still grow top-shelf cannabis with a good full PAR spectrum. The sun naturally includes UV, so outdoor growers get whatever effect it brings for free (note that outdoor weed often has slightly higher cannabinoid content partly due to full-spectrum sun including UV and far-red). Indoors, UV is like an “optional booster” – potentially enhancing quality but not necessary for baseline growth. Always prioritize your main lighting first (blue through red) before worrying about UV.
Summary of Spectrum: Cannabis benefits from a broad, balanced spectrum. Blue keeps it short and possibly increases quality, red drives robust growth and yields, far-red can be a strategic enhancer, green fills in the gaps and reaches lower leaves, and UV can add a touch of stress-induced potency. Many growers thus aim for a sunlight-like spectrum or use a combination of lights to achieve one. Scientific consensus is that full-spectrum lighting produces the healthiest and often most productive cannabis plants, as it engages all the plant’s photoreceptors in a balanced way and maximizes canopy photosynthesis. Avoid extreme spectrums (e.g., all one color) except for specific researched purposes. A final point: spectrum can also subtly affect cannabinoid ratios (e.g., UV might favor THC slightly, different spectra might influence CBD vs THC in hemp) and terpene profiles (light stress often boosts terpenes). While much of this is still being studied, by adhering to a well-rounded spectrum you ensure you’re not missing out on any of these potential benefits or unintentionally promoting a myth-based approach (like the old idea that plants only need red/blue – we now know they use all colors).
Lighting Strategies for Each Growth Stage
Cannabis has distinct growth phases – seedling, vegetative, and flowering (plus an intermediate transition stage) – and each has its own lighting needs. The intensity, photoperiod (day length), and spectrum can be adjusted at each stage to optimize growth while avoiding stress. Here’s a breakdown of how to manage light through the plant’s life cycle:
Seedling/Clone Stage
Characteristics: Newly sprouted seedlings or clones just starting to root are delicate and don’t have the machinery (leaf area, established roots) to use intense light. They can also be easily dehydrated or burned by too much radiation. At this stage, cannabis is focusing on rooting and forming its first true leaves.
Light Intensity: Low to moderate. Optimal PPFD for seedlings is around 100–300 µmol/m²/s. This provides enough photons for the young plant to start photosynthesizing and developing without overwhelming it. If PPFD is much below 100, the seedling may stretch excessively, becoming tall and spindly as it searches for light. On the other hand, above ~300 µmol for a tiny seedling, you risk light stress (wilting, bleaching) because the baby plant can’t utilize all that energy yet. A common practice is to start seedlings under CFLs or LED panels raised higher up to achieve maybe ~200 µmol at the seedling tops. Clones (unrooted cuttings) similarly prefer gentler light (even 80–150 µmol) until they grow roots, since intense light without roots to uptake water can desiccate them.
If using a strong main grow light (like a 600W lamp), it’s wise to keep it dimmed or far above seedlings, or better, use a separate seedling light or propagation dome. Many growers start seedlings under 18–24″ distance even with LEDs, or use only part of the light’s power. The goal is to hit that sweet spot (~150–200 PPFD) at the top of the young plants. Watch their response: if they’re stretching (long distance between nodes, leaning), they may need a bit more light. If they’re staying very low but not growing, or if leaves look pale/yellow (with no other cause), too much light could be an issue – often manifesting as seedling leaves that curl down or have white-ish patches.
Photoperiod: For photoperiod strains (not autoflowers), use a long day schedule (18–20+ hours light). Commonly 18/6 (18 light, 6 dark) is used from seedling through veg. Some growers do 24 hours light for seedlings, arguing it maximizes early growth. Cannabis seedlings can grow under 24h light (they don’t absolutely require a dark period in veg), but some research and grower experience suggest a short dark period (e.g. 6 hours) may improve root development and allow some night-time metabolic processes. In any case, never give a seedling less than ~16 hours of light at this stage, as you don’t want it to start flowering prematurely (which won’t happen until it’s mature, but for clones from flowering plants it could). Autoflower seedlings can be 18/6 or even 20/4 or 24/0 since their flowering isn’t triggered by dark – many run autos at 20 or 24 hours of light for maximum DLI early on, though again a minority prefer giving autos a little dark to mimic nature.
Spectrum: Seedlings don’t need intense red-heavy light. In fact, a bit more blue can be useful to prevent stretch. Many propagation lights are “cool white” which has good blue content. If using a full-spectrum LED or MH, that’s fine. You don’t need specialized spectrum here; just avoid very red-dominant light which might cause fragile, lanky seedlings. UV should be zero at this point – no need to stress babies.
Key tips: Keep lights at an appropriate height to achieve ~100–300 PPFD. Often ~60–90 cm (2–3 feet) for powerful lights, or ~30 cm (1 ft) for weaker propagation lights, but measure if possible. Ensure a humid environment – seedlings like RH 65–80%, which also helps them not dry out under lights. If using humidity domes, watch out that lights don’t overheat the air inside. Many growers use T5 fluorescents or low-wattage LEDs for this stage to avoid issues. Once seedlings have a couple sets of true leaves and roots developing (around 1–2 weeks old), you can gradually ramp up light intensity to transition into vegetative growth. Think of it as hardening off – similar to taking an indoor seedling outdoors gradually. Increase from maybe 200 µmol to 400 µmol over a few days, watching plant response.
Vegetative Stage
Characteristics: In veg, cannabis is focused on building a framework – lots of leaves, branches, and rooting out. The plants are much more robust now and can handle (and benefit from) stronger light. The goal in veg is usually to grow a stout, bushy plant to later support heavy flowering.
Light Intensity: Medium to high. Typically, 400–600 µmol/m²/s PPFD is a good target range during vegetative growth for many strains. This level of light drives fast photosynthesis for leaf and stem development without being so intense as to require CO₂ supplementation or risk saturating the plant. At around 500 µmol, cannabis can grow extremely vigorously in veg – you’ll see daily noticeable foliage expansion. Below ~300 µmol, you might get ok growth but slower and with more spacing between nodes (could be acceptable for a mother plant you want to keep slow). Pushing up to 600–700 in veg can further increase growth rate, but watch for any signs of nutrient or CO₂ limitation if you do. Many hobby growers run about 400–500 PPFD in veg to conserve a bit of electricity and because the plants simply don’t need more to fill a tent quickly. Recommended DLI in veg is often on the order of 20–30+ mol/day. For example, 18 hours at 500 µmol ≈ 32.4 mol/day, which is plenty for vegetative cannabis.
Remember that in veg you often have lights on 18+ hours, so even a moderate PPFD can yield a high DLI. That’s why some will run slightly lower intensity for more hours as it’s more energy-efficient and gentler on plants. But cannabis will take high intensity in veg as long as other factors are dialed (at Utah State’s research they veg at ~400+ µmol for 18h). One thing to consider: extremely high light in veg can create very compact growth (short internodes due to intense light + high photosynthesis). This can be good (sturdy plants) but also can mean less stretch later. If you plan to SCROG or keep plants short, blasting them in veg helps. If you need them taller, you might veg with a bit less intense light to encourage some stretch. Use light as a tool to shape plants.
Photoperiod: Keep long days (18/6 or even 20/4). There’s generally no benefit to exceeding 20 hours of light – at 20 or 22 hours some strains start showing signs of stress (droopy leaves, etc., indicating they like a short rest). 18/6 is a safe, tried-and-true schedule for vegetative growth. It gives a great balance of growth and a 25% energy saving compared to 24h continuous. Studies on various species (and anecdotal cannabis reports) suggest diminishing returns beyond 18 hours – the extra light from 18→24h doesn’t translate proportionally to growth. So most growers stick to 18/6, which also helps maintain a nice day-night rhythm for the plant. Make sure absolutely no interruption of dark during veg either (though less critical than in flower, a stable cycle is better). If you are in a rush, you can do 20/4 to eke out a bit more growth daily, especially for autos in veg.
Spectrum: Full spectrum or even metal halide (which is blue-rich) works well. A slightly higher blue fraction in veg keeps plants compact and lush. Many growers who used HPS for flower would use MH for veg for this reason. With LEDs, a “veg mode” might add more blue/white. But it’s not strictly necessary – you can veg under the same lights as flower if they’re full-spectrum; just sometimes people dial down the red if possible. UV is still not needed in veg – it could stress the plant unnecessarily. Far-red can be used sparingly if you want to encourage a bit more leafiness or if your canopy is very dense to ensure lower branches get light. But heavy far-red in veg will definitely make plants taller. Most just rely on the natural ~5-10% far-red content of broad spectrum lights.
Notes: Keep raising lights or adjusting power as plants grow to maintain the proper PPFD. If your veg space starts getting too full or hot, sometimes dimming is better than raising lights (to keep spread uniform). Watch plant nutrition – under the bright veg light, they will uptick in nutrient demand. Often nitrogen deficiencies show if light is outpacing feed, since veg is N-hungry. A healthy green color and rapid new growth indicate lighting is on point.
Flowering Stage (Bloom)
Characteristics: Once you flip to 12 hours of darkness, cannabis transitions to the reproductive phase – focusing on bud (inflorescence) development. During early flower (weeks 1–3) plants undergo a stretch where they may double in height. After that, they dedicate energy to producing flowers, pistils, and trichomes. Lighting needs in flowering are geared towards maximizing bud size and density, and maintaining the photoperiod signal for flowering (12+ hours uninterrupted dark).
Light Intensity: High. Flowering is when you usually push your highest PPFD levels to maximize yield. A common target is 600–900 µmol/m²/s during peak flowering. Many growers aim around ~800 as a sweet spot if no supplemental CO₂. At 12 hours, 800 µmol gives ~34.5 mol/day DLI, which is within the optimal range for cannabis bloom. If you go up to 1000 µmol, that’s a DLI of 43.2 mol – achievable and can increase yield further, but typically only worthwhile if CO₂ is added and the strain can handle it.
For most home growers without CO₂, staying in the 600–900 range will deliver excellent results. If you have CO₂ enrichment, you could consider 1000–1200+ in mid/late flower and possibly see gains, as one study noted linear yield increases up to 1800 under enriched conditions. But beware of heat and ensure nutrients are sufficient if pushing that high. Also, extremely high light late in flower might theoretically degrade some terpenes or cannabinoids (because of higher heat/UV), so some growers actually dial lights down slightly in the final week or so to reduce stress on ripening buds – though others keep blasting till harvest.
Interestingly, after week 3–4 of bloom, cannabis plants have a fully developed canopy and are not growing new leaves as much, so the leaves present are what will do photosynthesis for bud fattening. Keeping those leaves healthy with strong light is key. You might notice under low light, buds are airy or “larfy.” Under high light, buds become dense and calyxes swell – this is partly due to abundant photosynthates (sugars) being produced and shuttled into flower growth. Light also influences how far into the canopy buds develop well. With stronger light, you get a deeper layer of well-developed buds; with weak light, only the top buds get decent development and the rest are popcorn.
Photoperiod: 12 hours light / 12 hours dark is the standard to initiate and maintain flowering for photoperiod strains. This must be strictly adhered to – even a couple short interruptions of the dark cycle can confuse the plant or cause re-veg issues (covered in the next section). Some advanced techniques use slightly shorter days (e.g. 11/13 or even 10/14) in late flower to accelerate ripening, but those reduce DLI and yield. Most stick to 12/12 from flip until harvest. Autoflowers in flowering can still be given long days (18/6, 20/4, etc. since they don’t respond to day length), which actually means autos often get a higher DLI than photoperiods in bloom, potentially yielding more in less time. So if you have autoflowering plants, you can continue with 18+ hours of light even while they flower – essentially they photosynthesize more hours per day (but also use more electricity). Many auto growers settle on 18/6 or 20/4 through the whole life cycle.
One interesting point: When you switch from 18h to 12h (for photoperiod plants), you are dramatically cutting the DLI. If you were at 500 µmol for 18h (32.4 DLI) and you go to 12h, that same 500 µmol only gives ~21.6 DLI. That’s a big drop in daily light. To compensate, growers often increase the light intensity when moving to bloom (if their fixture allows) or lower the lights to raise PPFD and partly make up for the shorter day. For example, one might veg at 400 µmol 18h and then aim for 800 µmol 12h in flower – so the DLI actually increases into bloom despite fewer hours. This helps sustain momentum and bud development. If you keep the intensity the same pre- and post-flip, expect overall growth rate to slow initially due to less total light per day (which is fine if you want a gentler transition). Many do gradually ramp intensity over the first 2–3 weeks of flower, going from maybe 600 µmol up to 800+ as the plants finish stretching. This gradual increase (sometimes called “high intensity flowering” strategy) ensures the plants are acclimated and can maximize bud growth mid-flower. Just don’t overdo it on day 1 of 12/12 – young pre-flower plants can still only use so much; better to peak the intensity around week 4–5 when buds are bulking up.
Spectrum: In flowering, a spectrum with ample red and a bit of blue and far-red is ideal. Many growers simply continue with whatever full spectrum they used in veg. If you have the ability to tune spectrum: you might increase red relative to blue now, to encourage bloom and maximize photosynthesis. Blue can be dialed down a tad (but not off) to allow a bit more stretch early flower (preventing overly squat plants) and to prioritize energy efficiency (red = more photons per watt). Far-red, as discussed, can be reintroduced later in flower to boost yield and resin, and some use a 15-minute burst of far-red at lights out to signal the plants to go to sleep faster (thus they effectively get a slightly longer dark period, potentially finishing faster or avoiding stress). UV can be considered in late flower to potentially increase potency – e.g. a UVB bulb for a couple hours mid-day in the last 2–3 weeks may trigger extra trichome production. It’s optional and must be done carefully (watch for burns), but it’s something some connoisseur growers do to push resin content.
One interesting spectrum note: anecdotal reports suggest slightly higher UV/blue in late flower can increase terpene content (perhaps by stressing plant a bit) and even lead to some color expression (if genetics allow) like purple hues, since UV/blue can spur anthocyanin pigment in leaves/buds. Just be cautious not to sacrifice growth for these effects – moderate doses are sufficient.
Finishing up: In the final week or so of bloom, some growers reduce light intensity, reasoning that in nature light intensity wanes in fall and it might help the plant finish without stress. There’s also evidence extremely high light can degrade terpenes via heat/UV, so backing off slightly (say from 800 down to 500 µmol) in the last few days could preserve more aroma. However, others maintain high light to the end for maximal bud swell. It likely depends on strain and grow conditions. If your plants look maxed out and a bit tired (yellowing, fading as they should in late flower), blasting them with intense light might not add much but could drive off volatile terpenes. So it’s reasonable to ease off a bit at the very end if you want to err on quality side.
To summarize each stage with approximate numbers:
-
Seedling: ~150 µmol/m²/s, 18–24h light, DLI ~5–10 mol/day. Gentle light to establish roots.
-
Vegetative: ~400–600 µmol/m²/s, 18h light (DLI ~25–35). Strong light to fuel rapid vegetative growth.
-
Flowering: ~800 (600–1000) µmol/m²/s, 12h light (DLI ~26–43). High-intensity to maximize bud formation. Possibly higher with CO₂. Maintain strict 12-hour dark period.
Always observe your specific cultivar – if leaves in mid-canopy start “praying” (pointing up) and showing excellent vigor, you’re in a good zone; if upper leaves curl, bleach white, or plants seem droopy midday, the light might be too intense. Adjust as needed. Each strain has a slightly different tolerance – some hazes/sativas handle insane light, while some indicas show light stress sooner. But by adhering to these stage-appropriate guidelines, you set the stage (pun intended) for a successful grow from start to finish.
The Importance of Darkness (Photoperiod and Light Pollution)
While providing ample light is crucial, so is providing ample darkness when it’s needed. Cannabis is a short-day (long-night) plant, meaning it flowers in response to long nights. In practical terms, for indoor growers of photoperiod strains, this means switching to a 12-hour uninterrupted dark period to induce and maintain flowering. Darkness isn’t just the absence of light; for plants it’s an active time when critical processes occur (like phytochrome state resets, respiration, and certain hormone productions like florigen). Here’s why respecting the dark period is just as important as blasting with light during the day:
-
Flowering Trigger: Only when cannabis receives roughly 12 or more hours of continuous darkness will it initiate flowering (with some variation by strain – some need >13 hours dark). This dark period allows the buildup of a hormone that triggers flowering. A single night of interruption can confuse this signal. Growers must ensure their flowering room is absolutely dark for the entire lights-off interval – no light leaks, no peeking in with normal lights. Even a brief exposure to light during the dark cycle can interrupt or delay flowering. The plant’s hormonal balance (specifically the phytochrome photo-receptor) is disrupted, potentially reverting it to vegetative growth or causing it to stall in an in-between state. If you’ve ever heard of plants “re-vegging” or “herming” (turning hermaphrodite) mysteriously in flower, light leaks are a prime suspect. Cannabis in bloom is highly sensitive to errant light.
-
Hermaphroditism (Hermies): One of the biggest risks of light pollution (unwanted light during dark) is stressing female plants into producing male pollen sacs. When the dark cycle is inconsistent or interrupted, the plant can perceive it as an environmental stress (as if it might not survive to finish flowering properly) and thus might produce male flowers as a last-ditch effort to self-pollinate. Light leaks are a known cause of hermaphroditism in cannabis. These hermies will seed your buds, ruining sinsemilla quality, so avoiding light stress is critical for top-quality buds. Keep in mind, certain strains are more prone to herm given any excuse, so they especially require pristine dark periods.
-
Development and Yield: Even if no hermaphroditism occurs, chronic light interruptions will reduce yields. The plant might remain in a vegetative or semi-veg state (foxtailing, re-firing new white pistils, etc.) instead of ripening properly. Delayed flowering is a common outcome, for example, a 8-week strain might take 10+ weeks if it’s getting nightly disturbances, because it’s not fully convinced to shift all energy to flowering. You may also see odd growth patterns, like reveg leaves (single blades) coming out of buds if the dark period is compromised.
-
How much light is too much? You might wonder what level of light constitutes a “light leak.” Research indicates cannabis is extraordinarily sensitive – one source noted that as little as 0.01 µmol/m²/s of PAR light during the dark period can elicit a response (that level is about 90,000 times dimmer than daylight intensity!). For context, a full moon on a clear night is around 0.002 µmol/m²/s. So roughly, it would take only about 5× the brightness of full moonlight to risk affecting the plant’s night cycle. This is very dim – much dimmer than typical streetlights or LED indicator lights on equipment. In practical terms, if you can see your hand in the grow room during supposed “dark,” it’s too bright. A common grower’s test is to sit in the dark room for a few minutes to let your eyes adjust – if you can then read a piece of paper or discern objects, there’s significant light leak. Note: pure red light is less visible to us, but plants can detect it (they are quite sensitive to deep red and far-red). Those tiny red power LEDs on fans or equipment can be enough to cause issues if they shine on plants all night. Always cover or eliminate any light source in the grow area during dark hours. Even green “headlamps” sometimes marketed as safe can cause problems if used too long or too bright, plants do respond to green if intensity adds up.
-
Why darkness matters to the plant: During the dark period, cannabis undergoes critical processes: it uses stored energy to grow buds and roots, it shifts hormone balances (like high melatonin in humans at night, plants have their own nightly hormone cycles). The phytochrome system essentially measures night length – if nights are long, it triggers and maintains flowering. Interrupting darkness effectively “resets the clock” partway, making the plant think the night was shorter than it was, which can revert the flowering signal if done consistently. Think of it as a sleep cycle – if someone wakes you up every hour at night, you’ll be stressed and not function properly. The plant similarly needs uninterrupted “sleep” to properly transition to and through the flowering stage.
Best practices to ensure complete darkness:
-
Double-check the grow space for light leaks. Common culprits are zipper cracks in tents, ventilation ports, or thin walls. Sit inside when lights are off (and outside is bright) to spot any pinholes. Seal them with light-proof tape or covers.
-
Be mindful of external lights – e.g., a quick flip-on of the room light outside the tent, or light from a computer monitor, can leak in. During dark hours treat the area as a photographic darkroom.
-
Use green-spectrum “headlamp” only briefly and only if absolutely necessary. And keep it dim – while green is less disruptive, strong green light for extended time can also disturb flowering if above threshold. It’s best to schedule all work during the lights-on period. If you must inspect at night, a very dim green LED for a minute or two likely won’t do major harm, but use sparingly.
-
Consider “power outage” scenarios: If your lights go off unexpectedly or on at wrong times due to timer failure or outages, try to get back on schedule as soon as possible. One missed night or partial interruption early in flower might not doom the crop, but repeated issues will.
For autoflowering strains, darkness is less critical for flowering (they’ll bloom regardless of night length). However, they still benefit from a stable light/dark cycle for overall health. Many auto growers run 18/6 or 20/4 for the plant’s whole life to give some dark period, as autos do seem to appreciate some rest even if they don’t need it to flower. Some run autos 24h lights on – the plants will survive, but one could argue they never “sleep” which might cause more stress in some varieties. There isn’t a clear consensus, but giving at least 4–6 hours of darkness to autos likely doesn’t hurt yield much and might improve plant metabolism (plus saves electricity).
Light pollution outdoors: If you are growing outdoor cannabis, be aware of streetlights or porch lights. Cannabis in a backyard can indeed be kept from flowering by a nearby security light that stays on at night. Outdoor growers sometimes find their plants won’t flower in fall because a neighbor’s light is hitting them for a few hours each night. The 0.01 µmol threshold means even a relatively dim light could matter if direct. Solutions include shading the plants from that light or turning it off. On the flip side, some greenhouse growers intentionally use light (or interrupt with a brief light at midnight – “night interruption” technique used in greenhouses for other short-day plants) to keep mother plants vegetative. But for flowering plants, guard their night.
In conclusion, respect the dark! It’s just as vital as providing good light. Think of the dark period as the plant’s “flowering hormone charging time” – it needs to be undisturbed. Maintaining a strict photoperiod schedule with total darkness will ensure your ladies focus on making buds, not worrying about erratic signals. This scientific discipline pays off in avoiding hermies and maximizing yield and potency. After all, a cannabis plant can only produce those resinous, THC-rich flowers if it successfully completes its flowering cycle – and that relies on you giving it nights it can count on. When you take the effort to provide utter darkness, you are rewarded with a true bounty of buds that are fully mature and not seeded. It’s an often underappreciated aspect of indoor growing, but a cornerstone of high-quality results.
Cultivar Variations: One Size Doesn’t Quite Fit All
Up to now, we’ve discussed lighting in a general sense for cannabis. But it’s worth noting that different cannabis cultivars (strains) can have subtly different lighting needs and responses. Cannabis sativa, indica, hybrids, ruderalis-derived autoflowers – each may react uniquely to light intensity, spectrum, and photoperiod nuances. While the fundamentals apply to all (they all need lots of light, proper dark, etc.), a keen grower pays attention to their specific cultivar’s behavior and adjusts accordingly.
-
Light Intensity Tolerance: Some cultivars are light-hungry beasts that can take (and thrive under) extremely high PPFD, whereas others show signs of stress at somewhat lower intensities. For example, a tall equatorial sativa (think Haze or Thai genetics) which evolved under intense tropical sun might handle 1000+ µmol/m²/s with ease, continuing to photosynthesize without issues. In contrast, a broadleaf indica from higher latitudes or mountainous regions might prefer slightly less intense light – it will still want high light, but perhaps it saturates a bit earlier or its leaves show droop if you push too hard. Growers often observe that “strain A loved 80% power on the LEDs, but strain B started curling leaves until I backed it to 60%.” These are anecdotal adjustments. Generally, most cannabis cultivars have similar high light needs, but if you notice one strain is looking pale or stressed under conditions where another is fine, take note. It may benefit from dialing down the intensity a notch. On the flip side, a cultivar that keeps praying and reaching under max light might even want more – if you have the headroom (CO₂, etc.) you could feed it more light and see. Monitor your plant’s cues; every phenotype can differ. One grower gave an example: their Ice Cream Cake strain handled 50% light intensity as a seedling without stress, while a King Kong strain got stressed at that same level. This shows even at seedling stage, there can be differences in light sensitivity.
-
Optimal DLI and Photoperiod: Some indicas are quick to flower and might finish with slightly less total light (maybe they’re “done” earlier), whereas some long-flowering sativas want that intense sun for 12+ weeks. If you grow a 14-week Haze versus an 8-week Kush, you might find the Haze keeps stacking calyxes well under sustained high light for the extra weeks, whereas blasting the Kush for too long after it’s ripe could just dry it out. So, flowering duration and light needs correlate – longer bloomers (often sativa-leaning) may handle more cumulative light (higher total DLI over their lifecycle). Additionally, some modern hybrids have been bred in high-light indoor environments for generations, making them quite adapted to heavy light.
Photoperiod sensitivity can vary: some cultivars will begin flowering with just slightly over 12 hours dark (some growers report certain strains start blooming at 14 hours light / 10 dark), while others might require under 13 hours light to fully trigger. This usually isn’t a major factor indoors since we go straight to 12/12 which works universally, but it’s interesting for outdoor or if trying creative schedules (like Gas Lantern routine or similar, which are not mainstream but involve odd light cycles).
-
Spectrum Preferences: There is emerging research on how different spectra might favor certain chemotype expressions in different genotypes. For instance, perhaps a Purple Kush expresses deeper purple under a spectrum with more blue/UV. Or a high-CBD strain might not need as much UV to hit its cannabinoid potential as a high-THC one. These are subtle and not fully confirmed, but anecdotally growers of “colorful” strains often use cooler (blue-rich) lights to bring out colors, and those of high resin strains might experiment with UV supplementation. Some terpene-rich cultivars might respond to slight changes in spectrum (e.g., more terpene with a bit of UV stress).
-
Autoflowers vs Photoperiods: Autoflowering strains (with Cannabis ruderalis heritage) often stay smaller and may have slightly different light appetite. Many autoflower growers report that autos can be more sensitive to high light when very young (seedling/early veg), so they start them under gentler light and ramp up. But once in full growth, autos love light similarly to any photoperiod. One difference: because autos don’t require a dark period, you can run them 20 or 24 hours light. However, as noted, some auto cultivars actually yield better with a bit of dark – possibly because respiration at night helps the plant “build infrastructure.” It may vary by strain. If you grow autos, observe if 24h vs 20/4 schedule affects them. Some growers do side-by-side tests on clones/identical plants: interestingly, some autos show virtually no difference in yield between 18/6 and 24/0, implying they hit a point of diminishing return where continuous light doesn’t add growth (likely because physiological processes need downtime). Thus, the optimal photoperiod for maximum growth might vary by cultivar even in autos – one might max out with 20 hours light, another might utilize all 24.
-
Morphology and Canopy Structure: Strains with very dense canopies (big fan leaves, bushy indicas) might self-shade more, so you may need to increase side lighting or reflective walls to get light into the bush, or do more defoliation to open them up. A lanky sativa with thinner leaves allows light to penetrate better naturally. So the cultivar’s structure affects how you should deliver light. With a dense plant, maybe slightly higher overhead intensity is needed to push light down into the canopy (and/or strategic defoliation). With an open plant, moderate light can reach deeper bud sites without as much leaf removal. This is less about the plant’s light need and more about effective light distribution given its form.
-
Nutrient and CO₂ coupling: Some strains are heavy feeders and also heavy light feeders – they’ll take all you give. Others are picky feeders and might burn if you feed high, which in turn limits how hard you can push light (because you can’t up nutrients to match). For example, a delicate OG Kush cut might claw if overfed, meaning you have to keep EC moderate, and thus you might not want to blast it with extreme light that would demand higher feed. Versus a hardy commercial hybrid that you can feed aggressively and blast with light and it just yields like crazy. These differences aren’t directly “light requirement,” but the holistic response to high-energy growing.
Given these subtleties, it’s wise to treat general lighting guidelines as starting points, then fine-tune for your specific cultivar. How do you fine-tune? Through observation and possibly some experimentation:
-
Keep notes on how each strain reacts at various PPFD levels. If one shows light stress at 800 µmol (signs: upper leaves canoeing up or chlorosis), next run keep it at 600–700 and see if outcome improves. Conversely, if a strain is handling 800 easily with dark green, praying leaves, you could trial 900–1000 (with CO₂) to see if it increases yield further (assuming environment allows).
-
Notice yield differences: Some very resinous boutique strains might not increase yield much beyond a certain light level (they put energy into resin, not bulk), whereas others (especially modern production hybrids) increase linearly with more light. If a strain isn’t yielding more with extra light, you might save energy by not over-lighting it.
-
Spectral tweaking: If you have controllable spectrum, you could try giving one strain a bit extra blue to deepen color or keep it short, while another strain that’s naturally short you give more red to encourage a bit more stretch and size. Some LED systems allow separate channel control so you can customize per cultivar needs. For example, a very short indica might benefit from a hint of far-red to ensure it doesn’t stay too squat and gets good node spacing, whereas a tall sativa might need no far-red at all and possibly more blue to restrain height.
-
Photoperiod tweaking: Most stick to 12/12, but some sativa growers use 11/13 (shorter days) for strains that refuse to finish, to push them to completion. Some strains like re-veg monster cropping can tolerate irregular light cycles better (but this is an advanced/cloning topic). Also, a few strains are nearly autoflower or have semi autoflower traits – they might start blooming under even 16 hours of light if they reach maturity. Knowing your cultivar helps – some modern strains derived from tropical sativas can actually flower under >12h light if not careful, so those you keep vegging under 18h strongly until ready.
Ultimately, while all cannabis loves bright light, pay attention to your plants’ feedback. There is genetic diversity in cannabis, and that extends to how they handle light. As one source points out, some cultivars may require higher light intensities for optimal growth, while others thrive under slightly lower intensities. Each strain has an optimal range – find it through careful dialing in. When running multiple strains in one room, you may have to compromise or adjust plant placement (taller, light-loving plants directly under center of lamp; more sensitive ones off to the side where intensity is a bit lower). Some commercial growers even dedicate separate rooms or sections for light-hungry strains vs light-sensitive ones to tailor the environment.
In summary, know your strain: its heritage, typical morphology, and any known quirks. An indica from Afghan genetics might prefer intense light but cooler temps; a sativa from equatorial zones might take all the light and heat you can give. Auto strains from Ruderalis might not need as much intensity early on, but then crank in mid-flower. These differences are usually minor tweaks around the general optimal high light regime cannabis enjoys. By giving each cultivar slightly customized lighting treatment, you can eke out the best performance and avoid problems. As always, keep the approach scientific: change one factor at a time and observe, use objective measures (meters, yield weights, potency tests if available) to see what truly benefits your cultivar. That way you avoid perpetuating any anecdotal myths and instead accumulate data-driven knowledge tailored to your genetics.
Conclusion and Key Takeaways
Lighting for cannabis cultivation is both an art and a science. We’ve explored why light is fundamental – it powers photosynthesis, influences growth form, and even triggers protective chemistry that can enhance bud quality. We’ve defined the critical metrics of light intensity (PPFD) and daily dosage (DLI), emphasizing that cannabis, as a high-light plant, requires generous amounts of light, often on par with full sun conditions, to reach its full potential. We’ve also discussed the interplay of light with other factors: how pushing plants to yield with intense light necessitates a balanced supply of CO₂, water, and nutrients.
Equipped with this knowledge, a grower can light their crop in a way that maximizes yield and quality while avoiding common pitfalls. Here are some key takeaways and actionable tips to remember:
-
Measure and Target Optimal Light Levels: Don’t rely on guesswork or generic hanging distances. Use a PAR meter or good app to measure canopy PPFD. Aim for ~100–300 µmol/m²/s for seedlings, 400–600 µmol for veg, and 600–900+ µmol for flowering (adjust upward if using CO₂) as a starting framework. These intensities ensure your plants get enough energy (high DLI) at each stage without severe light stress. If in doubt, err on a bit lower then increase, watching plant response.
-
Maximize Daily Light (DLI) in Flower – Smartly: Flowering yields are directly tied to DLI. When you flip to 12/12, consider raising intensity to compensate for fewer hours. Keep pushing light (if plants are healthy) until you approach the point of diminishing returns (often around 800–1000 PPFD without CO₂). More photons = more buds, up to the genetic/physical limits of the plant. Just ensure you don’t “floor the gas” without also topping off the tank: high DLI should be paired with rich CO₂ (if possible) and ample nutrients/water.
-
Use a Full, Balanced Spectrum: Provide a broad spectrum that includes blue, green, red, and a touch of far-red – essentially mimic natural sunlight’s range. Avoid extreme purple-only or single-color lighting. All PAR colors contribute to growth. Blue keeps plants strong and compact, red drives photosynthesis, far-red can enhance yields if used wisely, and even green finds its use deeper in the canopy. A balanced spectrum also tends to produce the best cannabinoid and terpene profiles (and is easier on the eyes for you!).
-
Absolute Darkness for Photoperiod Plants: When it’s lights-out, make it truly dark. Prevent any light leaks during the 12-hour night. This means checking for tiny holes, covering device LEDs, and instilling a no-peek discipline. In flowering, treat darkness as sacred – it’s when the plant sets up its flowering hormones. Even a brief flash of light can confuse or stress them. The reward for diligence here is a seamless flowering with no hermies and full bud development.
-
Adjust Lighting to Plant Needs and Health: Monitor your plants daily under their lighting. If leaves are pointing up (praying) and a nice green, you’re in a sweet spot. If upper leaves curl or bleach, ease off the intensity or raise the lights. If plants are oddly floppy or stretching, they likely need more light or more blue spectrum. Also, consider strain differences – don’t rigidly stick to a recipe if one cultivar shows it wants a bit less or more light. Flexibility and observation are your friends.
-
Don’t Forget Light Height and Coverage: Maintain the recommended distance or PPFD mapping so that your canopy is evenly lit. Move lights up as plants grow to keep them in the right zone, or employ training (SCROG, LST) to keep an even canopy. Uneven lighting leads to uneven buds. If using multiple lights, overlap them for uniform coverage. Hot spots can be mitigated by raising the light slightly or using diffusers, whereas dim corners might need supplemental lighting. A uniform canopy PPFD (within say ±10-15%) is ideal for consistent results across all plants.
-
Exploit Photomorphogenesis (spectrum timing): Advanced tip, consider spectrum scheduling: e.g., use more blue early to prevent stretch, then allow more red/FR during bulk flowering to maximize weight, then maybe reintroduce blue/UV very late for resin/quality. This mimics the sun’s seasonal shift (bluer in spring, redder in late summer) and can fine-tune plant responses. It’s not mandatory, but if you have the tech, it’s one more lever to optimize results.
-
Keep Learning and Debunk Myths: We emphasized using scientifically supported practices and avoiding common grow myths. For instance, the myth “green light is useless” – we saw it’s false (plants use green substantially). The myth “more light always means higher THC” – not exactly; yield goes up with more light, but THC percentage can plateau (or even drop if light is too intense or causes stress). Another myth: “Plants need 24h light in veg for max growth” – actually many grow just as fast under 18h and enjoy a rest. By staying up to date with research (like Dr. Bugbee’s findings or academic studies) and carefully observing your garden, you can discern fact from fiction. Cannabis cultivation has many anecdotal claims; using tools and data will guide you to what truly works.
Growing top-tier cannabis means treating your lighting setup not just as bulbs in a socket, but as a calibrated system delivering the life force to your plants. With the information in this guide, you should feel confident designing a lighting plan that gives your plants what they crave: intense, well-measured, full-spectrum light by day, and total darkness by night, all in harmony with their growth stage and needs. The result will be vigorous vegetative growth, an explosion of fat, frosty buds in bloom, and ultimately a harvest of exceptional quality and quantity – dense flowers glistening with trichomes and bursting with aroma, the hallmark of a well-lit grow under the principles of science.
Remember, light is the language of plants. By speaking that language – in lumens and photons, PPFD and DLI – you unlock the full genetic expression of your cannabis. Happy growing and may your garden bask in the perfect glow!
Share this article

Written by : alexbuck
A quick overview of the topics covered in this article.
Follow us
Latest articles
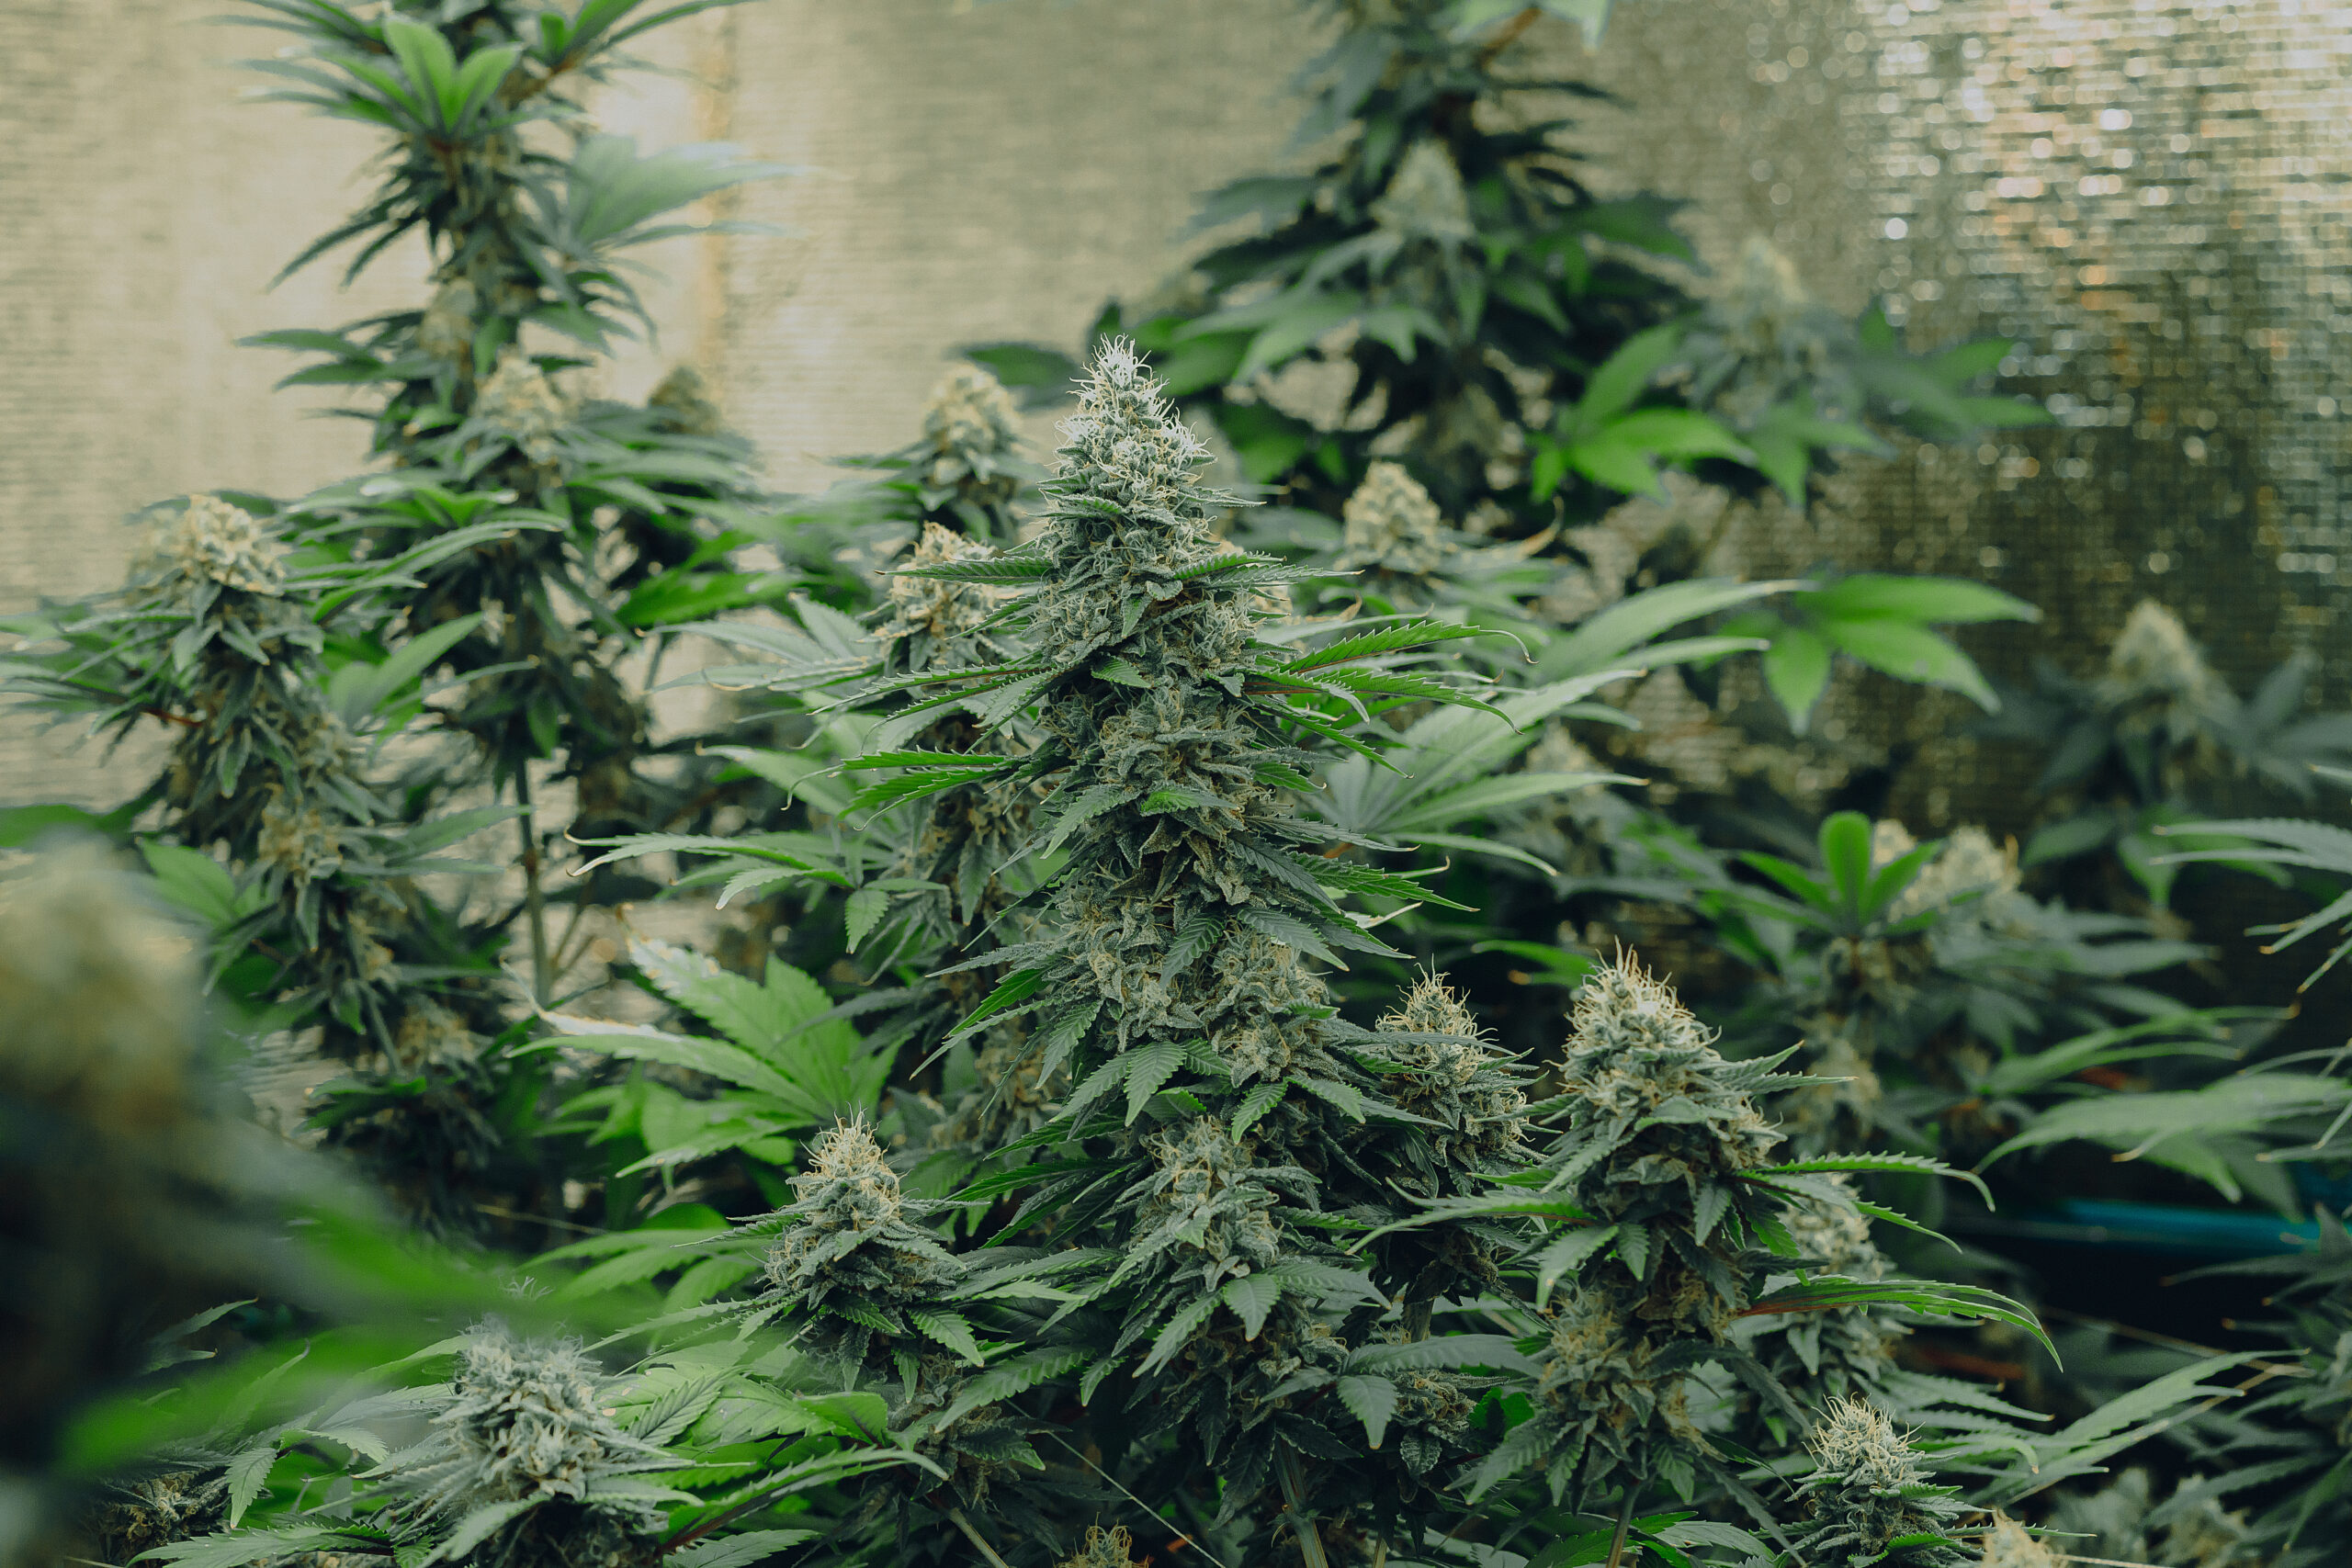
March 25, 2026

March 25, 2026
March 25, 2026