
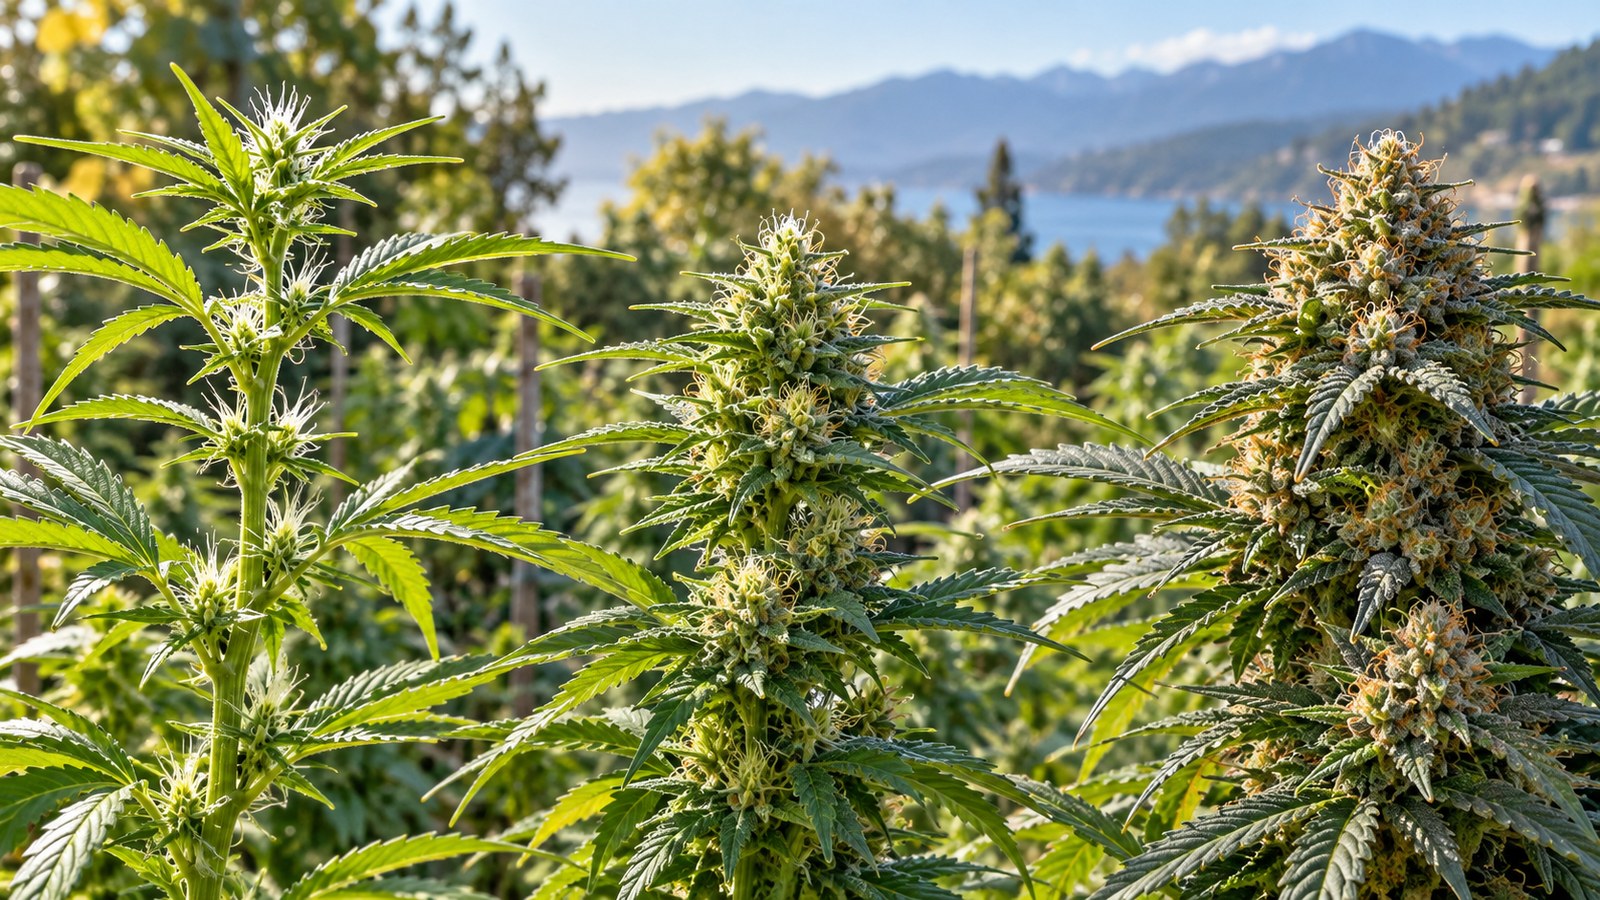
Outdoor Flowering Stages Without a Fixed Week Calendar
A plant has white stigmas at several nodes, but its main shoots are still extending. Another has compact flower clusters and has barely changed height since your last visit. Both may be described as “in flower,” yet they are at different points in reproductive development. A printed week chart can make that difference disappear.
Read outdoor flowering by the structures the plant is making and the changes you can verify over successive visits. Separate solitary flowers from established terminal inflorescences, track the shift from shoot extension to clustered flower growth, and assess later maturation from several representative flowers rather than one calendar date. Record the weather and cultivar alongside those observations. A date is useful history; it is not a diagnosis.
This resource concerns the stage decision, not an entire cultivation program. For site selection, establishment, general feeding and the complete seasonal sequence, use the comprehensive outdoor growing guide. Grow only where legal and on land you own or have explicit permission to use.
The Direct Answer: Follow the Plant, Not a Flowering-Week Chart
Outdoor flowering is a developmental sequence, not a universal nine-week countdown. A photoperiod-sensitive plant may show isolated female flowers well before its shoots organize into dense terminal flower clusters. Once flowering architecture develops, some plants stretch dramatically and others change height much less. Flower expansion, gland development, stigma aging and eventual senescence then proceed at rates affected by genetics and growing conditions.
Use five practical observation categories: pre-transition or solitary flowers; visible inflorescence initiation; early cluster building and stretch; expanding and consolidating flowers; and late maturation. These are field descriptions, not universally standardized cannabis phenological codes. Two categories may overlap on one plant. They are most useful when attached to marked growth points and dated photographs.
Define the decision before assigning a stage
Do you need to know whether floral development is established, whether vigorous height extension is ending, which flowers need closer wet-weather checks, or whether harvest evaluation should begin? Those are different questions. A label such as “week five” hides them all. Instead, state the question and select the observation that answers it. Inflorescence architecture answers the first question. Repeated measurements of the same branches answer the second. Internal flower condition and dry-down answer the third. Maturity assessment needs a separate, multi-signal evaluation.
When the evidence is incomplete, record a range such as “transition to early cluster formation” or “expansion with some mature upper flowers.” This is more accurate than forcing every growing point into one tidy week. A plant can have mature-looking upper sites and less advanced shaded lower sites at the same time.
Definition: Flowering onset in this field guide
The first sustained appearance of clustered reproductive growth at identifiable shoot tips, not the first isolated stigma at a node. Research groups use their own operational onset definitions; their numerical flower-count criteria should not be mistaken for a universal home-garden threshold.
Three dates worth recording separately
Keep the date when you first saw solitary flowers, the date you first confirmed developing terminal clusters, and the date you began evaluating mature inflorescences. Note uncertainty if the plant was not inspected for several days. Calling the first solitary flower “day one of bloom” can overstate how long the flowering canopy has actually been developing; calling the first dense bud the start can omit a substantial period of active inflorescence construction.
In controlled cannabis research, solitary flowers are documented under long-day conditions while shorter days drive the condensed inflorescence architecture. One morphological study explicitly distinguished a solitary stigma from multiple stigmas at the shoot apex to avoid mislabeling onset. The study’s count was an experimental definition, not evidence that every genotype reaches that appearance on the same date outdoors.
Remember: A date describes when you observed a structure. It does not establish when a hidden developmental signal began or predict the day every flower will finish.
The stage label is not a treatment instruction
A stage category can tell you what to inspect more closely, but it does not automatically specify an NPK ratio, irrigation volume, spray, defoliation schedule, or harvest decision. Measurements of root-zone conditions and clear symptoms are needed before changing water or nutrition. Any plant-protection treatment must be lawful for the specific crop and growth stage; see the relevant specialist resources rather than converting a stage name into a routine spray calendar.
How Outdoor Flowers Develop From Transition to Maturation
Look at architecture first and color second. Stigmas, small leaves, bracts, branchlets and resin glands contribute different pieces of information. If the terms are unfamiliar, the cannabis anatomy reference helps separate a bract, stigma, leaf and inflorescence before you begin recording stages.
Stage A: Adult growth and isolated flowers
Adult photoperiod-sensitive plants can form solitary female flowers at nodes while the main shoot still has a predominantly elongated vegetative architecture. A visible pair of stigmas confirms a reproductive organ, not necessarily an established terminal bud. Check whether new internodes continue appearing with relatively open spacing and whether the tip is still producing ordinary shoot units rather than a compact, increasingly branched flower structure.
Record the first date and photograph the flower’s attachment point so you can distinguish it from subsequent cluster formation. Do not cut or spread healthy tissue just to find the first possible flower. If the genotype is an autoflower, the timing signal may differ, but the visible organ distinction still matters.
Stage B: Terminal inflorescence initiation
At the shoot tip, multiple reproductive units begin clustering, branching patterns change, and the growing apex no longer looks like an ordinary leafy extension. Inflorescence formation can be asynchronous: the main stem may show a clear terminal cluster while lateral branches remain less advanced. Note the first unequivocal site and then check comparable terminals, not only the tallest cola.
Some studies identify onset using several visible stigma pairs at the apex. This improves consistency within an experiment but cannot make a universal garden calendar. A field grower can instead define a documented local criterion, apply it consistently, and say exactly what was counted.
Stage C: Early cluster building and continued extension
Flower initiation does not mean height growth stops immediately. Some shoots continue to extend while new flower sites multiply and internode spacing changes. Measure the same main shoot and two lateral shoots from fixed reference points rather than guessing from plant silhouette. An apparent jump in height can also reflect a branch being lifted, a tie loosening, or a container leaning. Verify the geometry before calling it a second flowering stretch.
Use repeat photographs of a terminal, middle and lower position to see whether flower units are increasing or whether the shoot is simply elongating without additional cluster development. A favorable early-flower reading combines several observations; white stigmas alone cannot distinguish vigorous cluster building from a stalled, light-disrupted or mechanically stressed shoot.
Stage D: Flower expansion and consolidation
Clusters become more developed and may grow in mass and apparent density. Branch tips can feel more heavily loaded, but avoid squeezing flowers to evaluate firmness. Bracts enlarge and glandular trichomes become more apparent. The internal microclimate also becomes relevant: increasingly packed floral tissue may hold moisture even after adjacent fan leaves look dry.
At this stage, add two checks to your records: a structural support check and an inspection-access check. Can you view representative flower sites without forcing branches apart? Do supports carry the developing weight without cutting into tissue? Are rain, dew, and fog followed by a reasonable observed dry-down? These observations help manage risk, but no exact flower diameter or calendar week establishes a universal disease threshold.
Warning: A full-looking flower is not automatically a healthy or mature flower.
Dense outer growth may conceal internal deterioration. Brown tissue spreading inward, unusual collapse, grey growth or a localized musty change deserves immediate careful inspection and appropriate containment, not a maturity label. Do not consume or attempt to salvage visibly moldy flower.
Stage E: Late maturation, not automatic harvest
The increase in flower volume slows relative to earlier expansion, stigmas may darken or recede, and glandular structures continue changing. Not every stigma changes at the same rate and not every genotype follows the same coloration sequence. Local injury, pollination and weather can alter the appearance of exposed organs. A photograph of one top flower cannot represent the entire plant.
Begin maturity assessment when multiple representative sites have developed full flower architecture and show changes over consecutive observations. Evaluate plant health and weather risk alongside quality criteria. Record the stage as “maturation assessment underway” until there is adequate evidence for the actual harvest decision. The detailed harvest procedure belongs in the broader harvest resource, not inside a week-by-week flowering guide.
A practical stage comparison
The following table uses reproducible features rather than a week number. Treat the categories as a map that can accommodate overlap, not as mutually exclusive boxes.
| Field stage | Most useful visible pattern | Next verification |
|---|---|---|
| Adult / solitary flower | One or a few node flowers with largely open shoot extension. | Check whether terminal architecture starts clustering. |
| Inflorescence initiation | Repeated reproductive units collect at shoot tips. | Photograph the same main and lateral tips for continuity. |
| Early cluster / extension | Flower sites multiply while selected shoots still lengthen. | Measure fixed branches and inspect newly formed nodes. |
| Expansion / consolidation | Flower mass and structural load increase; bracts fill out. | Check flower dry-down, branch support and inside-facing tissue. |
| Late maturation | Expansion slows and several flower organs show aging changes. | Compare multiple representative flowers and begin separate harvest evaluation. |
“There are white hairs at the nodes, but the top still looks like leaves. Am I already in the first week of flowering?”
Question sent by: Ethan Brooks, via email.
You have observed a reproductive sign, but not necessarily terminal inflorescence development. Photograph the same top and two laterals, then watch for compact clusters that continue developing. Keep the date of the solitary flowers in your notes without forcing a bloom-week label onto the whole plant.
Measure the Site Conditions That Change Your Stage Reading
The flower does not develop in isolation from its site. Sun exposure, nightly temperature, dew duration, root-zone function, wind, shade and inspection access affect the plant’s condition and how easily you can interpret it. This section is not a replacement for choosing and constructing an outdoor garden. It identifies the site measurements that explain discrepancies between developmental observations.
Record actual sun exposure, not only the compass direction
Mark whether the plant receives unobstructed morning and afternoon light, loses light behind a fence or structure, or gains shade as the sun lowers later in the season. A site that appeared open at midsummer can become partly shaded as solar angle changes. Note the dates and times of shade rather than estimating total light from one visit.
Reduced exposure may slow growth or cause lower flowers to lag while upper flowers remain more advanced. Shade does not establish a specific flowering stage. Use the same representative terminals on successive visits and compare their progression with light exposure recorded separately. Avoid diagnosing a light issue from a small, shaded flower alone.
Measure temperature and moisture where flowers actually sit
A weather-app forecast describes a broader area, not necessarily your flower canopy. Where practical, place a weather-resistant thermometer and hygrometer at a representative canopy position without wetting the instrument or placing it against a hot surface. Record conditions near dawn and during the warm part of the day when a particular problem calls for that detail. Note wet foliage, dew and whether individual flowers remain damp after surrounding leaves dry.
Cannabis greenhouse research has documented a warmer, more humid microclimate inside developing inflorescences than in surrounding air. That finding supports the need to inspect flowers directly; its measured humidity differences are not outdoor setpoints or proof that an outdoor flower shares identical conditions. Use your observation to identify slow-drying areas, not to manufacture a universal relative-humidity cutoff.
Separate root-zone limitation from a flowering-stage change
Check whether a container has become unstable or root-bound, whether native soil stays saturated after rain, and whether irrigation reaches the active root zone. Look for an evidence pattern: measured or observed water status, foliage posture, recent irrigation and weather, then the appearance of new tissue. A sudden pause in flower expansion after waterlogging or drought does not automatically mean the plant is mature.
Do not change the entire feed program solely because a week chart says the plant has entered “mid bloom.” Flowering does not eliminate the plant’s need for nitrogen or create one universal nutrient formulation. If health is deteriorating, document the cause as far as possible and address that issue rather than relabeling stress as normal ripening.
Map cold pockets, drainage and access before late flower
Low-lying areas and enclosed corners may hold cool air and dew differently from nearby open positions. A wet, shaded corner can create different disease exposure from a bright, breezy edge, even when plants began flowering together. Record the contrast and compare the flowers at matching structural positions.
Access also matters. A stage label based solely on easily reached outside flowers is vulnerable to sampling bias. Confirm that you can observe at least a representative upper, mid-canopy and lower position without stepping on roots or pulling loaded branches. For a broader inspection layout, use the relevant outdoor planning guidance; this article only establishes what stage data to collect.
Field Advice: Keep weather and plant morphology in separate columns. Bad weather can explain a slowdown, but it cannot substitute for evidence of which reproductive structures are present.
Latitude, Photoperiod, Season, and Cultivar Behavior
A fixed calendar assumes the same biological clock, the same light signal and the same environmental runway for every plant. Those assumptions fail outdoors. Day length changes with latitude and season, plants differ in their sensitivity, and field conditions rarely reproduce a controlled chamber’s sudden switch from long days to short days.
Why the equinox is not a universal flowering switch
Photoperiod-sensitive cannabis generally builds its condensed inflorescences in response to an appropriate sequence of shorter days and longer nights, but researchers have documented meaningful cultivar differences in critical photoperiod. In a study of essential-oil, grain and fiber hemp, flowering responses varied across tested light cycles, and cultivars sharing a name from different sources sometimes behaved differently. Those results disprove a universal 12-hour trigger but cannot be transferred into an exact flowering hour for every modern drug-type cultivar.
The date at which a given day length occurs varies by latitude, and twilight can contribute biologically effective light. Under field conditions the day length changes gradually, unlike a growth room switching abruptly on a timer. Artificial light near a garden can further complicate night exposure. Record a plausible lighting history and the actual stage instead of assigning onset to a solstice, equinox or internet latitude chart.
Autoflowering material requires a different timing interpretation
Day-neutral or autoflowering cannabis has genetic mechanisms that reduce dependence on the short-day flowering cue. Research has identified more than one locus associated with photoperiod insensitivity. Such plants still progress through observable floral stages, but their transition should not be dated from the seasonal decline in day length. Also, “autoflower” is not a guarantee of identical days to harvest across cultivars or individual plants.
Record sowing or establishment as historical context, then identify actual terminal flower onset separately. A small, early-flowering plant may be experiencing its normal genotype-specific schedule or may have lost vegetative growth to stress. Size alone cannot distinguish the two.
Use cultivar descriptions as hypotheses, not finish-date contracts
A vendor’s flowering period may come from a controlled room, a different region, a particular phenotype or an undisclosed definition of day one. Unless its growing system and flowering-start criterion are specified, the number is a rough planning reference. Keep source or seed-lot records where available. For repeated cultivation of the same verified material, build your own history of onset, growth transition, wet-weather interruptions and actual harvest condition.
Temperate, subtropical and high-latitude sites face different day-length and finishing constraints. A late-finishing plant at a site with early autumn frost or repeated rain has less opportunity to complete maturation safely than the same plant in a long, dry season. This is an environmental planning constraint, not proof that one should harvest every flower at a fixed date.
What does research really let you predict?
Controlled studies support genotype-specific responses to photoperiod and demonstrate that single flowers, compact inflorescences and mature flowers are distinct events. Field trials support meaningful variation in flowering time and growth among cultivars and locations. They do not yield a universal formula that predicts maturity for an unidentified outdoor plant from latitude, height and a strain name.
Definition: Critical photoperiod
The day-length condition at which a particular genotype’s flowering response changes under specified experimental conditions. It is not automatically twelve hours, is not a universal threshold for all cannabis, and is different from the number of days required to develop or mature flowers afterward.
Build a weather window rather than a harvest deadline
Look at the local pattern of first frosts, prolonged rain, persistent fog and the accessibility of your lawful site. Identify where you will obtain reliable forecasts and how quickly you can inspect plants after a weather event. The backup plan may be a safer supported position, improved inspection access, or a lawful decision to harvest affected material earlier when health and quality justify it. Do not promise a universal freeze tolerance or recommend heating devices that create electrical or fire hazards.
“My neighbor’s plant formed buds before mine, although we planted on the same weekend. Is mine late?”
Question sent by: Julia Schneider, via contact form.
Planting date alone cannot answer that. Compare documented genetics if known, confirm that your plant has received a stable night environment, and photograph terminal flower development on both plants. They may have different critical photoperiods or simply be at different stages. Investigate a problem only when the growth pattern or independent health evidence supports one.
A Repeatable Stage-Mapping and Response Procedure
Build one field record that can survive missed visits and changing weather. A useful record identifies the plant, the exact growth point, the stage criterion applied, independent environmental observations and the result of the next visit. Choose an inspection frequency appropriate to growth rate and risk. The weekly framework below is a baseline, not a reason to ignore an urgent weather or disease problem between visits.
Step 1: Establish the baseline before the canopy changes
Identify each plant with a durable label and log seed or clone provenance, cultivar designation if credible, establishment date, and whether its flowering behavior is known or uncertain. Sketch orientation and available access routes. Choose three representative zones: a well-exposed terminal, a middle or inside-facing flower site, and a lower developing site. Add a fourth if one side faces more shade or weather.
Use a consistent plant-level photograph and close views that include the flower’s attachment point. Do not label an unobserved earlier event as certain. The correct entry after a two-week absence may be “terminal flowers already visible on first inspection,” not an invented start date.
Step 2: Document flower anatomy before counting days
For each marked point, note whether it has solitary flowers, a developing terminal cluster, continued internode extension, expanding bracts, or a developed flower ready for maturity assessment. Do not confuse stipules with stigmas or a single stigma pair with a dense terminal inflorescence. A hand lens can help locate organs, but avoid opening healthy flowers or repeatedly handling glandular tissue just to assign a label.
Step 3: Take repeatable extension measurements
Where a branch is accessible without bending it, measure or photograph the distance between two stable reference points using the same orientation each time. Note whether supports or container position changed. Recording “main terminal gained length; middle lateral did not” is more useful than a claim that the whole plant has entered “week three stretch.” If you cannot measure safely, standardized photos and an honest qualitative entry are acceptable.
Step 4: Read the canopy at several positions
Compare the main tip, two exposed laterals and at least one less-exposed flower site when the plant permits. A single mature-looking flower does not represent shaded areas, and a lagging lower flower does not mean the entire plant has stalled. Record the predominant stage and relevant exceptions. If a branch has been damaged, describe that branch separately instead of allowing it to redefine the plant’s developmental stage.
Step 5: Add a separate site and health record
Note recent rain, dew, heat, cold, wind and abnormal nighttime lighting. Inspect root-zone moisture when relevant, check whether any flowers remain wet, and assess branch supports. Keep these findings outside the stage column. They describe causes or risks that could alter apparent progress, not the botanical definition of an inflorescence.
Step 6: Assign a provisional stage and one decision
Use the comparison table and your photos. A classification such as “early cluster development on most exposed tops, solitary flowers lower down” is actionable: you now know where to inspect next and why the plant cannot be reduced to a single bloom-week number. Do not trigger multiple interventions merely because a stage name has changed. Decide whether to maintain stable conditions, correct a measured problem, add needed structural support, inspect suspect tissue, or begin separate harvest evaluation.
Step 7: Plan the next comparison before leaving
Write down which growth point to revisit and what observation would change the decision. If flowers are enlarging normally, check their progression and access. If a dark-side branch appears stalled, compare fresh structures with the previous image while reviewing light and root status. If wet flowers show suspicious brown tissue, move into the specific disease-inspection procedure immediately rather than waiting for a stage milestone.
Step 8: Commission your stage map against a second observer or photograph
A reproducible method should allow another careful reader to identify the same marked sites and understand why you chose each category. Ask whether your photos show the attachment points and enough surrounding tissue. If two observers disagree, identify the missing observation and record the plant as transitional or unresolved. Do not settle a disagreement by choosing whichever answer fits the advertised harvest date.
| Decision state | Evidence currently available | Next action |
|---|---|---|
| Transition uncertain | Isolated stigmas without sustained terminal clusters. | Mark shoot tips; compare new cluster architecture at the next visit. |
| Development confirmed | Terminal clusters enlarge across repeated observations. | Record stage and shift inspections to flower dry-down and support as appropriate. |
| Stage uneven | Upper flowers expand while shaded lower sites lag. | Keep separate zone records; do not date the entire plant from one flower. |
| Progress appears stalled | Little visible change plus an independent environmental or health concern. | Investigate the confirmed variable; compare new tissue rather than relabeling as mature. |
| Possible late maturation | Several fully developed flowers show continued maturation changes. | Begin a separate harvest-readiness assessment at representative locations. |
| Urgent deterioration | Internal browning, collapse or suspected fungal growth. | Use disease containment and diagnostic guidance immediately, regardless of stage. |
Pro Tip: Photograph an entire flower, its attachment and the surrounding branch in one sequence. An extreme macro image is excellent for a particular organ but poor at proving how the whole shoot has developed.
Failure Modes and Look-Alikes That Distort the Timeline
The common mistakes share a pattern: an external event changes how the plant looks, and the grower interprets the appearance as an automatic move forward or backward in the flowering calendar. The correction is to ask which developmental feature actually changed and what independent evidence identifies the cause.
Solitary flowers mistaken for a completed transition
Stigmas at nodes can precede terminal flower architecture. A plant may still produce new ordinary internodes and leaf-bearing shoot units. Confirm repeated cluster formation at identifiable tips. Do not make feeding, pruning or projected-harvest changes from one pair of hairs.
Stretch mistaken for renewed vegetative growth
Early inflorescence development may coincide with pronounced elongation. Stretch alone does not prove revegetation, and a lack of stretch does not disprove flowering. For a genuine reversion hypothesis, look for renewed vegetative-style shoots arising from previously developed flowers after a plausible photoperiod change. The dedicated diagnosis belongs in the Revegetation Signs vs Stress-Deformed Leaves resource when its public URL is verified.
Light interruption mistaken for an unusually late cultivar
Artificial night lighting can change photoperiodic behavior in susceptible cannabis. Research has shown flowering delays with sufficiently intense nighttime light under controlled conditions, but the results do not establish a universal safe distance or brightness for a garden lamp. If flowering seems unusually delayed, document the source, duration and direction of light exposure without trespassing, unsafe electrical work or blaming a neighbor without evidence.
Drought or waterlogging mistaken for finishing
Premature leaf decline, halted flower expansion or a stressed appearance is not a maturity test. Compare root-zone water status, recent heat, irrigation reliability and new-growth behavior. An injured plant may look old without having completed desired flower development. Correct a measured problem when feasible and safe; do not promise that recovery will restore lost time.
Brown stigmas mistaken for universal harvest readiness
Stigma color can correlate with chemical maturation in a given study, but genotype matters. A 2025 cannabis study examining 25 genotypes found peaks for measured cannabinoid concentrations at later stigma-color categories for most, with exceptions peaking earlier. This does not justify a universal brown-stigma percentage, nor does it say that outdoor weather, seed set or damage cannot alter stigma appearance.
Keep stigma changes, bract development, representative gland condition, documented genotype behavior and environmental risk in separate fields. Decide maturity from their combined pattern and the intended quality criteria, not one color viewed from the path.
Amber trichomes mistaken for a chemical laboratory
Glandular trichomes change shape, size and appearance during development, with effects that vary by genotype and plant age. Sampling position matters: trichomes on sugar leaves may not represent those on flower bracts. An amber head cannot reveal a complete cannabinoid or terpene profile by sight. Use clean, consistent magnification on comparable flower tissue if visual maturity tracking is appropriate, and use laboratory analysis when actual chemical concentration is required.
A compact flower mistaken for a healthy flower
In cannabis greenhouse research, denser inflorescences had elevated internal moisture compared with surrounding air, and some fungal symptoms originated within flowers before becoming conspicuous externally. Outdoor plants have additional rain and dew exposure, but the greenhouse numerical findings cannot define a field disease threshold. If suspicious inner tissue or expanding browning appears, treat it as a health concern rather than declaring a normal late-flower color change.
Do: Compare the same flower sites, record separate environmental evidence, and reserve a distinct field for injury or suspected contamination.
Avoid: Calling a wet, brown, stagnant or damaged flower “finished” because it matches a date or color in a chart.
Rain, fog, trapped moisture and heat under a temporary cover
A cover can change the exposure pattern while creating other hazards, including stagnant humid air, accumulated heat, structural collapse and unsafe access. If a lawful protective structure is already used, inspect the actual flower and cover conditions. Do not recommend a sealed tent, heater or electrical fixture as a simple solution to an autumn forecast. For a full storm assessment, consult the post-storm inspection guide.
Cold events and storm damage
Forecasts are uncertain and frost exposure differs among sites. A cold-damaged leaf or broken branch does not establish flower maturity. Map the damaged area separately, inspect for secondary deterioration, and base any harvest decision on both the condition of the usable flowers and a realistic remaining weather window. No universal frost-temperature tolerance applies to every genotype and garden configuration.
“After a week of rain, the tips are brown. Does that mean flowering is finished?”
Question sent by: Mason Carter, via Facebook page.
No. Rain exposure and brown tips do not establish maturity. Check whether the browning is normal stigma aging, damaged leaves or suspicious flower tissue. Record where it occurs and whether it spreads. If tissue is collapsing or shows mold-like growth, prioritize containment and a safer diagnostic response. Do not use a harvest chart to dismiss deterioration.
Harvest Maturity, Legal Access, and Safety Boundaries
Flowering-stage identification is not the same as deciding that flowers are ready, safe or lawful to harvest. Treat readiness, contamination and legal compliance as separate gates. A flower can be mature but contaminated. Another may be immature but at risk from an approaching storm. A third may be healthy yet subject to legal testing, harvest, possession or transport restrictions.
When to begin maturity checks
Begin systematic evaluation after representative flowers have built substantial inflorescence structure and their expansion or organ appearance is changing across visits. Check multiple positions and record the same tissue type under comparable viewing conditions. Observed stigma maturation and trichome characteristics contribute information, but the relationship to cannabinoid concentration is genotype-dependent. If commercial or medical specifications require chemical confirmation, visual assessment is insufficient.
Do not set a universal ratio of clear, cloudy or amber heads. Separate flower-bract glands from sugar-leaf glands and avoid repeated handling that damages tissue. An early-looking lower branch should not automatically force every upper flower to remain exposed through hazardous weather. Equally, a single advanced top should not redefine the entire plant as ready.
When risk overrides the planned inspection interval
Visible mold-like growth, progressive internal decay, structural collapse, a failed irrigation system or hazardous weather calls for a prompt safety-oriented assessment rather than waiting for the next weekly stage record. Where a legitimate harvest decision becomes necessary, document why and separate risk-driven timing from preferred quality maturity. Do not advise processing or consuming visibly moldy cannabis.
Warning: An attractive exterior cannot clear contamination.
Suspected mold, chemical drift, floodwater contamination and unknown spray residues require their own evaluation. Visual trichome maturity does not make contaminated flowers safe. Follow applicable local rules for handling, testing and disposal.
Legal access is a continuous condition
Grow only where cultivation is lawful and where you have permission to use the land. Local jurisdictions may regulate plant numbers, visibility, structures, odors, water use, residue compliance, harvesting, storage and transport differently. This guide does not assume that any one country’s or state’s rules apply elsewhere. Verify current local requirements with official authorities and legal advisers when necessary.
A remote garden must remain accessible for lawful inspection. Do not trespass, evade monitoring requirements, install dangerous deterrent traps, create a fire risk, or modify public lights or utilities to change flowering behavior. If you cannot check flowers safely after bad weather, that lack of access is itself a planning constraint, not a reason to make an unseen harvest judgment.
Keep site design and harvest technique in their own resources
This article uses shade, water, drainage, wind and cold-pool measurements to interpret flowering stages. It does not redesign the entire site. The outdoor basics guide covers broader decisions about the season and site. For recurring humid-season risks, the humid-subtropical outdoor guide supplies the wider climate context. Specific harvesting, drying and curing procedures remain in their dedicated resources.
The Outdoor Flowering Stage Checklist
Carry the same record from pre-season planning to the final observation. Pre-season work makes a realistic field procedure possible; weekly checks capture the evidence that a fixed calendar misses. Increase inspection frequency after consequential weather or when suspicious flowers appear, and never delay an urgent safety response simply to preserve a weekly cadence.
Before the season: prepare the stage record
Confirm lawful access and relevant local restrictions. Choose an accessible inspection route, locate likely shade shifts and cold pockets, and identify where weather records will come from. Confirm that the water supply and drainage can be inspected. Label plants and retain honest cultivar or seed-lot information, including uncertainty. Decide how representative terminal, middle and lower flower sites will be identified later, and plan an alternative if a support structure blocks your access.
At the first reproductive sign: separate events
Record first solitary flowers without automatically starting a bloom-week countdown. Photograph an identifiable node and the plant as a whole. Continue watching for terminal clusters, and log their first confirmed appearance separately. If observations are infrequent, record onset as a date range rather than inventing the hidden transition date.
Every routine stage inspection: collect comparable evidence
Revisit the same marked sites. Photograph the overall plant, main terminal, a representative lateral and a lower site. Record growth extension, flower clustering, bract expansion and any maturation change. Add site information including rain, dew, shade, temperature anomalies, nighttime lighting and root-zone concerns. Inspect branch support and access without squeezing or opening healthy flowers.
When progress does not match the expected pattern
Check the prior photograph and stage definition first. Then review light history, cultivar uncertainty, water status, physical damage and possible disease separately. Choose the smallest evidence-supported response and record what should change if the hypothesis is correct. Keep “unresolved” as a valid category when signs conflict. A second observation can be more informative than several simultaneous interventions.
At apparent late flower: open a different decision file
Stage progression tells you when maturity assessment is appropriate. It does not replace that assessment. Compare multiple flower positions, treat contamination separately, review the actual weather and legal constraints, and record the reason for any eventual harvest decision. Do not let an advertised flowering period override what the plant and site are showing.
Final field checklist
- Plant identity, legal access and source history recorded; unknowns clearly marked.
- First solitary flowers and first terminal cluster observations dated separately.
- Representative upper, middle and lower sites marked and photographed consistently.
- Stage based on repeated flower architecture and growth, not the advertised week number.
- Shade, wetness, temperature, root-zone condition and night-light history logged separately.
- Uneven development and suspect tissue recorded by location, not averaged away.
- Health emergencies addressed without waiting for a scheduled stage check.
- Harvest readiness evaluated separately across representative flowers and safety criteria.
- Next observation, expected sign and backup response written down before leaving.
The strongest flowering calendar is a record you build from the plant itself. Dates, weather and cultivar history give context; consistent observations identify the developmental stage; and a separate maturity and safety assessment determines what happens at the finish. The objective is not to make every outdoor plant follow the same timetable. It is to make your own decision reproducible and explainable.
Educational content. Always follow applicable cultivation laws and safety requirements.
Share this article
A quick overview of the topics covered in this article.
- The Direct Answer: Follow the Plant, Not a Flowering-Week Chart
- How Outdoor Flowers Develop From Transition to Maturation
- Measure the Site Conditions That Change Your Stage Reading
- Latitude, Photoperiod, Season, and Cultivar Behavior
- A Repeatable Stage-Mapping and Response Procedure
- Failure Modes and Look-Alikes That Distort the Timeline
- Harvest Maturity, Legal Access, and Safety Boundaries
- The Outdoor Flowering Stage Checklist
Follow us
Latest articles
October 11, 2026
October 11, 2026
October 11, 2026
October 11, 2026
